
Lab Handbook
This is the Lab Handbook of the Translational Sensory & Circadian Neuroscience Unit (MPS/TUM/TUMCREATE)
Contributing
To contribute to this book, please have a look at the how to.
Mission Statement
The following is a collection of principles that we follow in our research group. The statement contains values and expectations that were initially derived from discussions at the 2022 lab retreat at the TUM Akademiezentrum Raitenhaslach and updated at the 2023 lab retreat in Owingen and the 2024 lab retreat at Schneefernerhaus (Zugspitze). It is a living document.
Version history
Current version/date: v1.4 | 2 September 2024
License
This work is licensed under a Creative Commons Attribution-NonCommercial 4.0 International License.
Inclusive, diverse and collaborative lab culture
We are committed to creating a social environment that is collaborative, friendly, non-judgemental and inclusive. We are a diverse and international team, and our goal is to foster a culture of belonging where we celebrate our differences, learn from each other and grow as scientists and human beings together. We want everyone in our team to feel supported as scientists and individuals, and as such, we model our behaviour as colleagues and mentors to be empowering and to create a working space that is safe and free from any type of harassment and discrimination on the basis of gender, age, class, ethnicity, country of origin, belief, disability or neurodiversity* status. When we witness any of these harassing or discriminating behaviours, we are active bystanders*. We critically reflect our ability to accomplish this, and seek training to upskill.
We also seek to actively widen access to scientific knowledge and academia for people from traditionally underrepresented backgrounds through offering internships in our lab, and contributing to institutional programs designated to this purpose (such as CaCTüS and Girls'Day).
Open scholarship and open science
We are committed to pursuing and advancing open scholarship in research and teaching. This concerns the whole scientific process, including preregistration and publishing. Our goal is to make science transparent and accessible, not only to fellow scientists but extending to students and the general public. We prioritise publishing our scientific publications in open-access outlets. We seek to normalise open science practices in the lab. This includes prioritising version control and documentation for analysis scripts, as they will be made transparent online. We encourage and want to aid replication attempts of our results. We engage with external requests for sharing materials, code and data and offer support.
We strive to work in an open-source ecosystem. This means using preferably non-proprietary, open-source software. Importantly, benefitting from other’s open source software, we also see responsibility in contributing to the software development process to our ability (e.g. reporting issues). Furthermore, we share our data as research outputs.
We organise open and free webinars and share recordings of scientific talks online to make educational resources and insights into scientific progress accessible to a diverse and international audience. In line with this goal, we consider science communication and public outreach part of our scientific mission.
Reproducibility and scientific integrity
Our mission is to perform robust and reproducible research. We achieve this goal through various actions, including documentation of program code and analysis steps, preregistration of experiments, internal replication, and data and code reviews. We establish naming conventions for files and we write standard operating procedures (SOPs) for experiments, data collection and -management, data storage and for analysis. We respect subjects’ privacy, therefore we collect pseudonymized or anonymized data whenever possible.
We want to constrain the “researcher degrees of freedom” in analyses by carefully specifying analytic strategies prior to data analysis. We avoid “research waste” and in the case of negative results, we will publish them. We prioritise quality over quantity in producing the data and in the publication of results. In case of mistakes in already published work, we acknowledge these mistakes and work to correct them.
Sustainability
We commit to sustainability and sustainable research practices built on reducing and reusing. This includes reducing CO2 emissions, reducing waste (paper, food, plastic, ...) and reusing resources. We achieve this by a variety of means:
We aim to share instruments and repair old instruments instead of buying new devices. We encourage reducing (paper, plastic) waste and ask our institutions to switch to digital forms. We aim to make our code efficient and test it, use sustainable computing practices, and share code and data. In the long run, we intend to include sustainability and sustainable research practices in our teaching and aim to work on a sustainability-related topic within our field for 1 out of 5 student projects.
Where possible and feasible, we commit to commuting by foot, bike or public transport and choose local or online conferences over long-distance ones that require flights. We consider the carbon footprint of our activities and consider these prior to deciding whether to attend a conference. We reduce waste in general and paper waste by sharing printed articles and books. At events that we organise, we provide vegetarian catering options and encourage low-carbon travel options.
Commitment to meaningful and societally relevant science
As scientists, we are part of society. We are committed to doing meaningful and societally relevant science. Our focus is on understanding and characterising biological, physiological and psychological phenomena that can benefit and advance society and humanity. One example is conducting studies that inform how to promote and improve human health and wellbeing. We are driven by curiosity and the wish for discovery, with a clear goal for our work to be impactful, and not simply produce statistically significant results. As largely publicly funded scientists, we have a responsibility towards the public.
One way we give back to society is by engaging with the public through a variety of means, such as giving public talks, participating in and organizing science outreach events, developing educational resources, comic books, podcasts, and giving interviews. We seek and create opportunities for the application and translation of our work (such as through the Ladenburg White Paper).
We do not wish to dumb our science down – but rather make it accessible. This includes opening our doors during open days, producing materials and keeping a public presence.
Wellbeing and work-life balance
We acknowledge that working in academia poses threats to well-being and work-life balance. We consider this a major challenge that we address. We are committed to our work without losing sight of our well-being. Accordingly, we value a healthy work-life balance. Employees are allowed to design their own working schedule and can work from home by arrangement. During holiday time, employees are not expected to be involved in work-related matters, including responding to emails and messages. Our team is encouraged to engage in self-care and hobbies in their free time. Moreover, stress-reducing activities, such as yoga, meditation, and/or exercise, are supported during working hours. We encourage people to take sick leave when necessary, including for mental health issues and to protect each other. We actively participate in team events, such as health days and fun runs.
This encompasses a supportive environment among lab members with no discrimination against any physical and/or mental impairments. In addition, constructive feedback is provided to support each other, and conflicts are mediated in an appropriate manner. We are flexible to accommodate people with families and make family-friendly arrangements.
Policies
Equipment use
| Policy | Equipment use |
|---|---|
| Objective | Describe policies for equipment use |
| Owner | Manuel Spitschan |
| Reviewer | n/a |
| Approver | n/a |
| Contributors | n/a |
| Version | 1.0.0 |
| Last edit | Manuel Spitschan |
| Date | 20241213 |
Background
In the unit, research data is collected using various types of physical equipment. This equipment is either used in the laboratory or given to participants for field/ambulatory measurements.
Equipment is generally shared between projects and researchers. Given finite resources, equipment is part of our assets and, therefore, should be protected and handled with care.
General equipment use
Please follow these guidelines when using equipment:
- Read the instruction manual or handbook for any equipment carefully that you will use for your research
- Use the equipment carefully, ensuring that it remains functional and also clean
- Pay particular attention to using USB connectors and connect and disconnect cables carefully, with no use of mechanical force
- Individuals in the Unit likely have ample experience with the equipment you will be using. If you are unsure who this might be, get in touch with Manuel to ask
- Equipment should be returned in a functional and clean state such that the next person using it will have no problems using it
Inventory
To keep track of equipment and its use, when equipment is used in a specific project or study, it needs to be officially loaned out to an individual. This helps track where equipment is and whether it is currently in use.
Upon checking out equipment for a project, please perform a first check to ensure that indeed the equipment is functional.
NOTE: More information on inventory coming in 2025.
Cleaning
Equipment should be kept clean. After every participant, components that directly touch the participants' skin, such as chin rests should be disinfected. In particular wrist straps require also in-depth cleaningcleaning.
Logging errors and faults
To be able to track errors or faults that occur with equipment, these instances of errors should be logged in the Device malfunction reporting log. Completing the survey triggers an email to Manuel, who will likely get in touch with further questions.
Conventions
Project ID
Scope
The following presents a standardised way for assigning Participant IDs.
Definition
Core
Central Participant ID
Every participant that participates in our group is assigned a Central Participant ID (CentralParticipantID). This Central Participant ID is assigned centrally by the data base operator, which is Manuel Spitschan.
The Central Participant ID is formed as follows:
YY####
Here, YY corresponds to the year in double digits (i.e. 22 for the year 2022), and #### corresponds to the running participant number from the date of entry. #### is leading with zeros, i.e. 0001 for the first participant.
For the first participant recruited in 2022, the central participant ID would be 220001, for the second 220002 and so forth.
Project Participant ID
Every participant participating in a specific project is also assigned a specific participant ID relevant for this project. This is called ProjectParticipantID. The number is assigned at consent and added to the central data base. The Project Participant ID is formed as runing number starting with 101, where this is the first participant in the project.
Project ID
Scope
The following presents a standardised way for assignig Project IDs.
Definition
Core
Project ID
Project should be named in an informative way. They should not contain the name of the experimenter of PI.
File names convention
Scope
The following presents a standardised way for naming files within project folders, as well as collaborative files meant to be shared within lab members.
Principles
As a rule of thumb, file names must be machine readable, human readable, consistent, and convenient for ordering within a folder.
Following these principles, filenames should:
-
Start with a timestamp (refer to Timestamp convention),
-
Contain key words explaining the content of the document, using lowercase
-
Have underscore separators between key words
Definitions
This generates the following naming scheme:
YYYYMMDD_nameof_document.<FileExtension>
Example:
20241006_abstract_sla.docx
For collaborative files, such as documents which need to be reviewed by another person, a version and initials (capital letters) of the person who last edited the document must be added.
Example:
20241006_abstract_sla_v1_SP.docx
Version numbers should be increased every time a document is modified, and initials have to be added at the end of the file name after another person has reviewed the document. For example, the following would be the same document as above after DR has edited it:
20241006_abstract_sla_v2_SP_DR.docx
Timestamps
Scope
The following presents a standardised way for forming timestamps.
Definition
Timestamps should be formulated as a string following this pattern according to the ISO 8601 standard:
yyyyMMddTHHMMSS
Here, yyyy standards for a four-digit year, e.g., 2023, MM is the month, e.g., 01 for January, dd for the day of the year, e.g., 01 for the first of the month.
The T is a separator between date specification and time specification.
The time specification follows HH for hours, MM for minutes, and SS for seconds. As an example, 18:33:22 corresponds to 6 pm, minute 33 at second 22. When no second information is available, the SS information should be set to 00.
Generating the timestamp
To generate such a timestamp in Python, you can use the following command:
from datetime import datetime

timestamp = datetime.now().strftime("%Y%m%dT%H%M%S")
print(timestamp)
This code snippet retrieves the current date and time using datetime.now() and then formats it according to the desired pattern %Y%m%dT%H%M%S. The %Y represents the four-digit year, %m represents the two-digit month, %d represents the two-digit day, %H represents the two-digit hour in 24-hour format, %M represents the two-digit minute, and %S represents the two-digit second.
The output will be a string representing the current timestamp in the yyyyMMddTHHMMSS format, following the ISO 8601 standard.
Variables
Scope
The following presents a standardised way for naming variables and their response options, specifically arising from questionnaires and surveys.
Definition
We agreed to use the following conventions for demographic variables and answer possibilities and for specific meaaurement instruments as for the Karolinska Sleepiness Scale (KSS) (10 is optional).
The standard YesNo question is a binary question with 1=Yes and 0=No. If more answer options are needed, the question must be named other, for example YesNomO (for YesNo multiple otions).
The option "Prefer not to say" is always the last option in single choice answers. The option "Not collected" is not provided as a choice to select, this is an internal coding.
- For "Preferred language" the following note has to be added to the question: "Note: If you do not prefer either of the languages, you are not eligible for the study. This means you can not participate in the study."
Standard Demographic Variables
| Description | Variable | Meaning | Code | Question | Notes | Meaning German | Question German | |
|---|---|---|---|---|---|---|---|---|
| YesNo | yesno | Yes | 1 | binary question | Ja | |||
| yesno | No | 0 | Nein | |||||
| Sex | sex | Female | 1 | Sex assigned at birth | Weiblich | Bei der Geburt zugewiesenes Geschlecht | ||
| sex | Male | 2 | Männlich | |||||
| sex | Intersex | 3 | Intersexuell | |||||
| sex | Not collected | -1 | Nicht erhoben | |||||
| sex | Prefer not to say | 0 | Ich möchte keine Angaben dazu machen | |||||
| Gender | gender | Woman | 1 | What gender do you identify with? | Frau | Mit welchem Geschlecht identifizieren Sie sich? | ||
| gender | Man | 2 | Mann | |||||
| gender | Non-binary | 3 | Nicht binär | |||||
| gender | Other | 4 | Andere | |||||
| gender | Not collected | -1 | Nicht erhoben | |||||
| gender | Prefer not to say | 0 | Ich möchte keine Angaben dazu machen | |||||
| Age | age | Age in years | Age in years | integer value | Alter in Jahren | Alter in Jahren | ||
| Employment | employment_status | Full time employed | 1 | What is your employment status? | Vollzeit | Wie sind Sie beschäftigt? | ||
| employment_status | Employed part time | 2 | Teilzeit | |||||
| employment_status | Marginally employed (Minijob) | 3 | Geringfügig beschäftigt (Minijob) | |||||
| employment_status | Not employed but studying or in training | 4 | Nicht beschäftigt aber in Studium oder Ausbildung | |||||
| employment_status | Studying and employed | 5 | Studium und beschäftigt | |||||
| employment_status | Not employed | 6 | Nicht beschäftigt | |||||
| employment_status | Not collected | -1 | Nicht erhoben | |||||
| Education | education_level | Less than secondary education (no school degree or up to 7th grade) | 1 | Your achieved level of education | Weniger als Sekundarstufe (kein Abschluss oder bis zur 7. Klasse) | Ihr höchstes erreichtes Bildungsniveau | ||
| education_level | Lower secondary school degree (up to 8th/9th grade) | 2 | Sekundarstufe I: Förderschulabschluss, Mittelschulabschluss (bis zur 8./9. Klasse) | |||||
| education_level | Higher secondary school degree (up to 10th grade) | 3 | Sekundarstufe II: Mittlere Reife, Realschulabschluss (bis zur 10. Klasse) | |||||
| education_level | General Certificate of Secondary Education or equivalent (up to 12th/13th grade) | 4 | Allgemeine oder fachgebundene Hochschulreife (bis zur 12./13. Klasse) | |||||
| education_level | Vocational degree or equivalent | 5 | Berufsausbildung oder äquivalent | |||||
| education_level | Bachelor's degree or equivalent | 6 | Bachelorabschluss oder äquivalent | |||||
| education_level | Master's degree or equivalent | 7 | Masterabschluss oder äquivalent | |||||
| education_level | Doctorate or equivalent | 8 | Promotion oder äquivalent | |||||
| Preferred language | preferred_language | English | 1 | What is the language you prefer to do the study in?* | Englisch | In welcher Sprache würden Sie gerne an dieser Studie teilnehmen? | ||
| preferred_language | German | 2 | Deutsch | |||||
| preferred_language | None of them | 3 | Keine von diesen | |||||
| Preferred language proficiency (self-rated) | preferred_language_proficiency | Native | 4 | How proficient are you in your preferred language? | Muttersprache | Wie gut beherrschen Sie Ihre bevorzugte Sprache? | ||
| preferred_language_proficiency | Advanced | 3 | Fortgeschritten | |||||
| preferred_language_proficiency | Intermediate | 2 | Mittleres Niveau | |||||
| preferred_language_proficiency | Basic | 1 | Grundlegende Kenntnisse |
Specific measurement instruments
| Description | Variable | Meaning | Code | Question | Notes | Meaning German | Question German |
|---|---|---|---|---|---|---|---|
| Karolinska Sleepiness Scale (KSS) | kss | Extremely alert | 1 | Please rate your sleepiness in the last 5 minutes | Extrem wach | Bitte bewerten Sie Ihre Schläfrigkeit in den letzten 5 Minuten | |
| kss | Very alert | 2 | Sehr wach | ||||
| kss | Alert | 3 | Wach | ||||
| kss | Rather alert | 4 | Ziemlich wach | ||||
| kss | Neither alert nor sleepy | 5 | Weder wach noch schläfrig | ||||
| kss | Some signs of sleepiness | 6 | Einige Anzeichen von Schläfrigkeit | ||||
| kss | Sleepy, but no effort to keep awake | 7 | Schläfrig, aber kann noch ohne Mühe wach bleiben | ||||
| kss | Sleepy, but some effort to keep awake | 8 | Schläfrig, habe Mühe wach zu bleiben | ||||
| kss | Very sleepy, great effort to keep awake, fighting sleep | 9 | Sehr schläfrig, kann nur mit großer Mühe wach bleiben; kämpfe gegen den Schlaf | ||||
| kss | Extremely sleepy, can't keep awake | 10 | Optional |
Folder structure
Scope
The following presents a standardised way for naming and organising project code, materials and data. The level of this specification is at the level of folders and files, which exist on local drives, network drives, in repositories and in data releases (e.g. those on FigShare).
Definition
Principles
The folder structure definition inherits several key naming conventions, including for Participant ID, Project Name and Timestamps.
Definitions
An experimental session is a repeatable instance of a laboratory visit, such as a one-evening experiment. Each experimental session will have its own folder named ##_expsession, where ## is the running number. We consider screening visits an experimental session and place them in the screening folder. There are also data modalities that do not conform to this definition of a session, e.g. actigraphy or sleep diary measurements, which cannot be linked to a specific session. These are
A block is repeatable instance of a collection of different tests.
A test is a repeatable test, e.g. saliva or PVT, questionnaires. A test can be a collection of trials.
Within a test, individual trials may occur, which are repeatable instance of a specific data collection unit, e.g. reaction time stimulus.
fMRI-specific definitions
Within the fMRI world, there are specific terms that we also use for consistency and clarity.
An fMRI session is a specific instance of participant entering the scanner.
Within an fMRI session, a participant will complete several runs, e.g. T1 structural scans or BOLD scans.
Overall structure
The overall folder structure is defined as follows. The following are well-defined placeholders: $ProjectID, $ParticipantID. $_repo corresponds to the project-specific name of specific codes.
$ProjectID/
	ethics/
	code/
		$_repo
	data*/
		derivatives/
		outputs/
		raw.csv
		raw/
			$ParticipantID/
	docs/
	materials/
		questionnaires/
		sops/
	outputs/
	README.md
	reports/
		posters/
		presentations/
		manuscripts/
README.md
The file README.md contains information about the project, including the author.
ethics folder
The ethics/ folder contains documentation about ethical approvals, including the full ethical application, approval letters and recruitment material. Any iterations of ethics should be included in this folder.
code/ folder
The code/ folder contains code used to run the experiment, analyse data, and other snippets of code to make the experiment reproducible. Depending on the project requirements, it is recommended to have separate GitHub repositories for different bits and pieces, e.g. separate out code to run the experiment from code to run the analysis. In any event, all code should be version-controlled on GitHub.
The code/ folder may also include notebooks for reproducible analyses, e.g. Jupyter notebooks.
data*/ folder
The data*/ folder contains all data collected in the project. This includes raw, processed and derived data. The raw/ data folder is included to be organised by participants. Depending on the project needs, the folder structure of derivatives can be more loosely populated. We consider derivatives data that are one step away or multiple steps from the raw data, e.g. manually cleaned or preprocessed data. The outputs/ folder contains any outputs directly generated from the data that are useful but not meant for publication.
The data/ folder can be accompanied by a sufix that differentiates between data collected at different stages or under different experimental protocols. For example data_pilot/ and data_main/. There can be as many data folders as needed, as long as the prefix of data*/ is maintained, and each folder follows the same underlying structure or pattern.
Data in in the data/ folder follow the following pattern:
$ProjectID/data*/<processing step>/$ParticipantID/<session number>_expsession/<modality>/<block number>_<tests>[-<test number>]_<timestamp>.<file_extension>
The raw.csv file contains an overview of the data collected and available in the data/ folder. This is to keep an inventory of the data collected.
The data/raw/ folder is organised with the following subfolders:
data/raw/screening/
data/raw/continuous/
data/raw/01_expsession/
data/raw/02_expsession/
data/raw/03_expsession/
...
data/raw/##_expsession##/
data/raw/group/
The group/ folder contains any data that are collected and only available at the group level and not at the individual-participant level. This includes, for example, data from REDCap or from devices that only collect data from multiple participants.
As an example:
CiViBe/
	data/
		derivatives/
		raw/
			101
				screening/
					metropsis/
						01_metropsis_<timestamp>/
					oct/
						01_oct_<timestamp>/
								01_oct_<timestamp>.metadata.txt
								01_oct_<timestamp>.dicom
								01_oct_<timestamp>.csv
				continuous/
					metadata.txt
					actigraphy/
						01_actigraphy_<timestamp>.txt
						01_actigraphy_<timestamp>.metadata.txt
					sleepdiary/
						01_sleepdiary_<timestamp>.txt
						01_sleepdiary_<timestamp>.metadata.txt
				01_expsession/
					log_<timestamp>.log <- Check (session-wise log)
					metadata.txt <-


					meta-data
					resources/ <- Optional
						00_beep.wav
						00_stimulus_sequences.csv
					pvt/
						01_pvt01_<timestamp>.csv <- Check if block is 2 numbers, then string, then timestamp
					01_pvt01_<timestamp>.csv
						01_pvt01_<timestamp>.log (test-wise log)
					oct/
						<block>_<test>-<number>_<timestamp>.<filetype>
						01_cornealthickness_<timestamp>.metadata.txt
						01_cornealthickness_<timestamp>.dicom
						01_cornealthickness_<timestamp>.csv
						01_macula_<timestamp>.metadata.txt
						01_macula_<timestamp>.dicom
						01_macula_<timestamp>.csv
						02_macula_<timestamp>.metadata.txt
						02_macula_<timestamp>.dicom
						02_macula_<timestamp>.csv
The screening folder contains all information related to the screening session.
Timestamps follow the Timestamps convention.
docs/ folder
The docs/ folder contains documentation related to the project.
materials/ folder
The materials/ folder contains questionnaires, SOPs and other materials to reproduce the data collectin effort.
outputs/ folder
The outputs/ folder contains figures, tables and other data outputs related to the project that will be used in publications and other external documents. Note that the data/ folder also contains an outputs/ folder which contains intermediate figures.
reports/ folder
The reports/ folder contains any published outputs related to the project, including posters (in posters/), presentation decks (in presentations/) and manuscripts (/manuscripts/).
Creating an empty structure
To create an empty folder, you can run the following commands in Terminal (OS X & Linux):
mkdir EMPTY_PROJECT
mkdir EMPTY_PROJECT/ethics
mkdir EMPTY_PROJECT/code
mkdir EMPTY_PROJECT/data
mkdir EMPTY_PROJECT/data/derivatives
mkdir EMPTY_PROJECT/data/raw
mkdir EMPTY_PROJECT/data/raw/101
mkdir EMPTY_PROJECT/data/raw/101/screening
mkdir EMPTY_PROJECT/data/raw/101/continuous
mkdir EMPTY_PROJECT/data/raw/101/01_expsession
mkdir EMPTY_PROJECT/data/raw/101/01_expsession/meas/
mkdir EMPTY_PROJECT/docs
mkdir EMPTY_PROJECT/notebooks
mkdir EMPTY_PROJECT/materials
mkdir EMPTY_PROJECT/materials/questionnaires
mkdir EMPTY_PROJECT/materials/sops
mkdir EMPTY_PROJECT/outputs
touch EMPTY_PROJECT/README.md
Standard Operating Procedure for Example Device
This template provides the structure for any SOP. Please add all the necessary sections. Note that, the section General Procedure is for an overview. An experiment must be described exhaustively in Experiment Procedures, thus redundancy may be necessary. Moreover, for any experiment, there needs to be a project-independent description. in Experiment Procedures and project-specific variations are linked in the beginning of the respective section.
Before publishing the SOP for a device, delete any examples and italic descriptions.
For creating neat tables, you can use a Online Table Generator.
| Device | Brand, Model |
|---|---|
| Objective | Describe objective of measurements |
| Owner | Firstname Lastname |
| Reviewer | Firstname Lastname |
| Approver | Firstname Lastname |
| Contributors | Firstname Lastname |
| Version | Start with 1.0.0 |
| Last edit | Firstname Lastname |
| Date | 20241213 |
Start up
Describe how to start up devices
- Checklist for materials
- Device model & serial number
- Accessories
- Parts
- Software with version number
- etc.
- Start up system
- Turn on power strip
- etc.
Preparation
Describe setup during experiment and necessary preparations before participant arrival.
- Position chair to ...
- Enter participant ID by doing ...
- ...
General Procedure
Procedures general to all experiments
-
Welcome particpant
- Ask to turn of mobile.
- etc.
-
Demos
- Describe how to run a demo.
- etc.
Experiment Procedure
Procedure for specific Experiments. Must not be project specific but experimet specific. Any project specific variation need to be linked to another section.
Measurement A
List variations with links first.
| Description | Link to variation |
|---|---|
| Project A | Project A measurement A |
| Project B | Project B measurement A |
Describe general of an experiment A in detail. For instructions, please provide english and german versions, with help of deepl.com/de/ or a collegue's.
-
Do X.
-
Participant instruction (EN/DE):
This is an instruction. English instruction first. For writing a multi-line instruction, kist continue to write after the ">" without empty lines. You can use line breaks.
Dies ist eine Instruktion. Enter german instructions afterwards. Use an empty line before instructions in other languates.
-
Do Y.
Measurement B
Same structure as example measurement A.
Data Saving
Describe here how to save data. Can be multiple sections, e.g. "Export Data" and "Transfer to Storage"
-
Export/Access Data
- How to access generated data and how to export data from the software.
- etc.
-
Transfer to Storage
- How to store data in designated storage space.
- etc.
| Description | Link to variation |
|---|---|
| Project A | Project A storage transfer |
| Project B | Project B storage transfer |
Shut down
Describe here how to end experiment and shut down system
Project specific measurements
Measurement A in Project X
Variation of Measurement A. Example measurement A is described in Example Measurement A
Storage transfer in Project X
Actimetry
Chapter about various actimetry devices, including the Acttrust Condor Actigraph, the Fibion SENS sensor and the ActiGraph Actimeter.
Standard operating procedure for ActTrust2
Act Studio SOPs
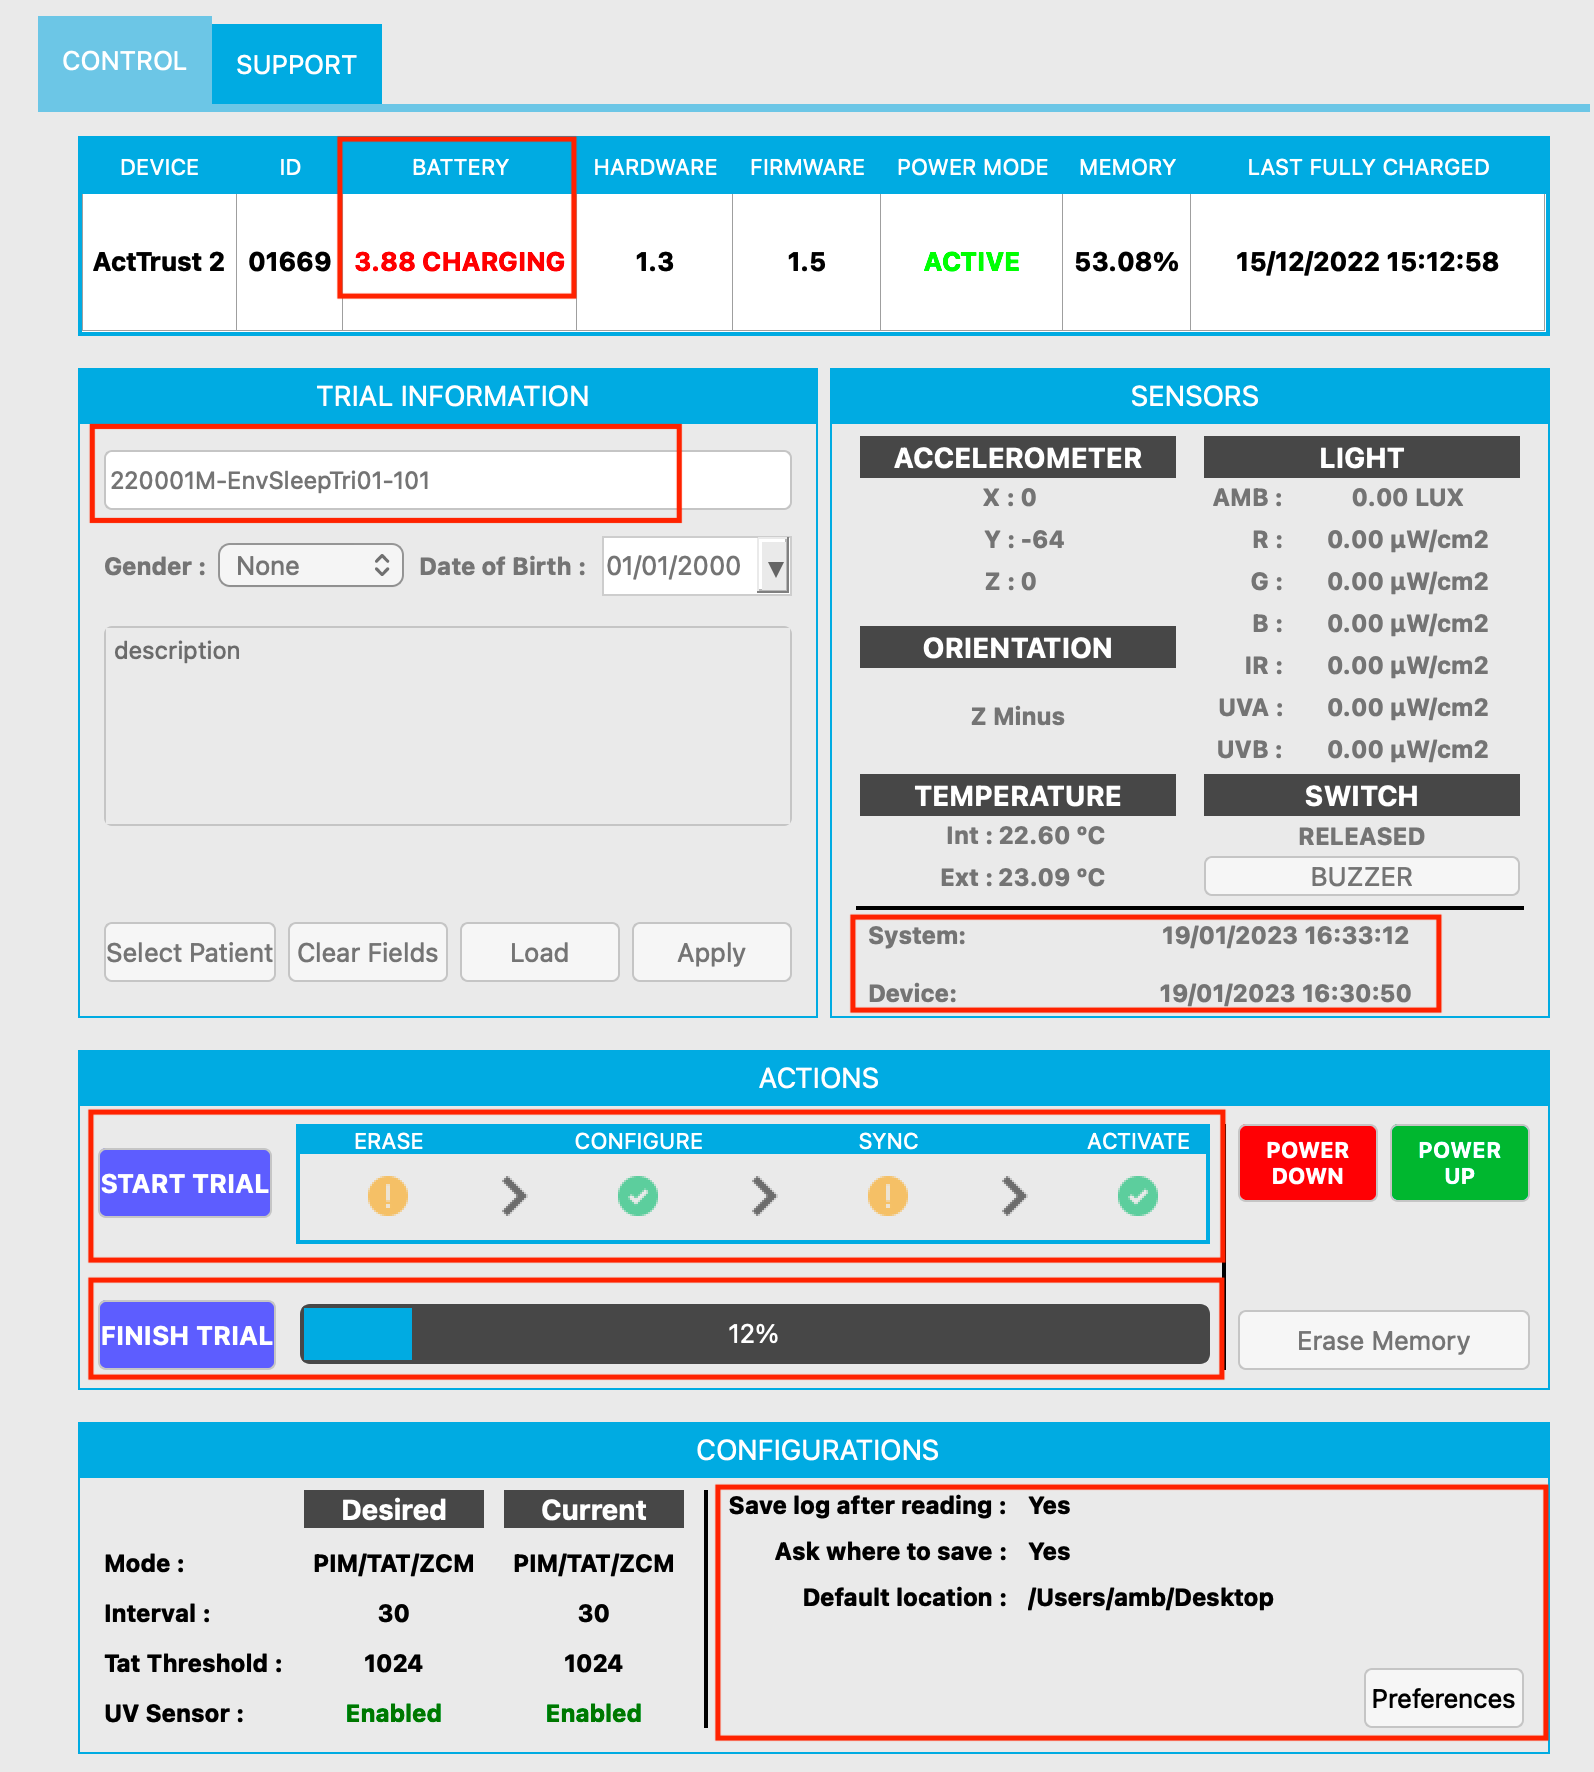
For the description below, the ActTrust software (ActStudio) version used was: v.1.0.23 The most up to date version is v.1.0.24
Setting up a recording
-
Open ActStudio
-
Connect your ActTrust with the computer (via cable and docking station)
-
(Potentially need to “power up” the device with the green button at the right bottom)
-
Change the name of the Participant ID under “Trial information” > name -> There are cases in which the Participant ID does not need to be specified, e.g. when there is no participant wearing the device in environmental measurements. In those cases, it would be recommended to use an identifier that is specific to the project.
-
Note down the device number and link it with the participant ID
-
Do not enter any additional information, e.g. gender or date of birth
-
Leave the description free unless absolutely necessary
-
View “Desired” and “Current” configurations to determine whether a change needs to be made in mode, intervals, threshold and UV sensor data collection
-
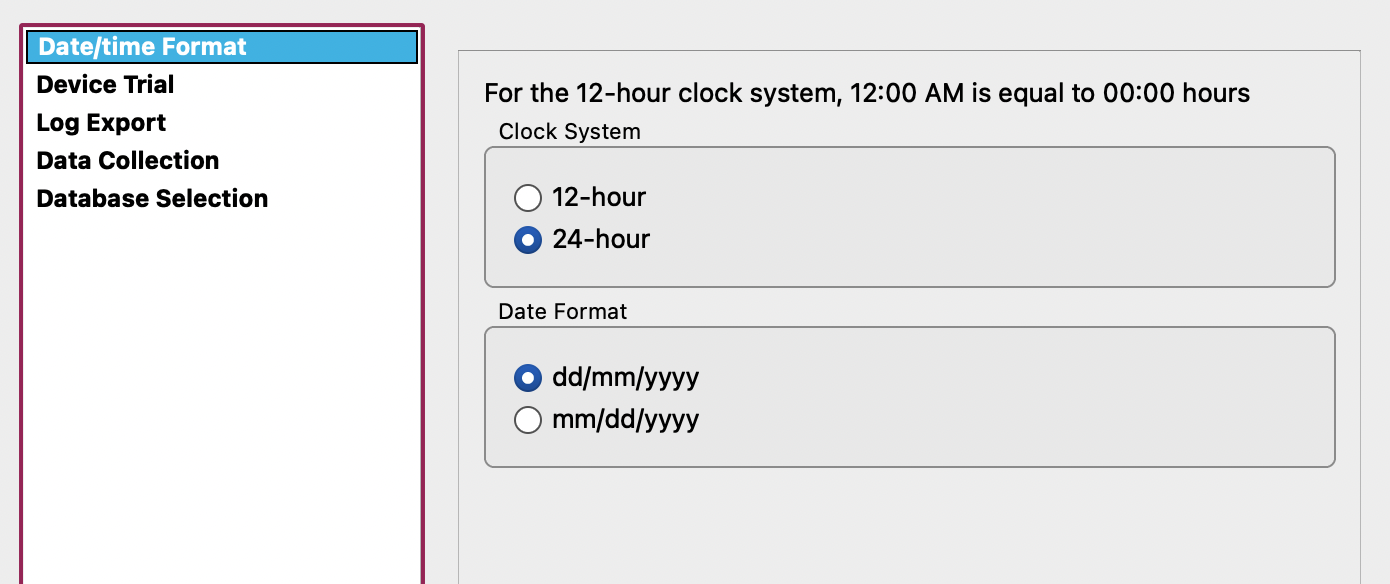
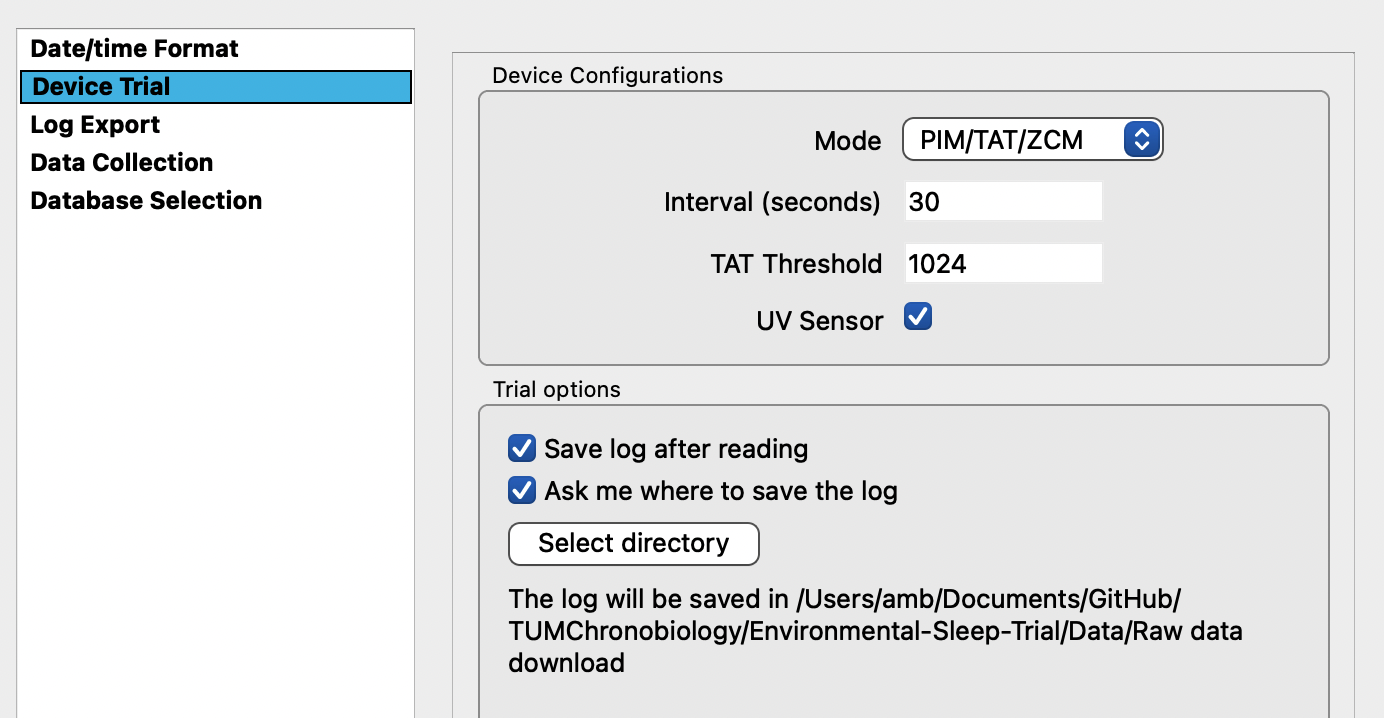
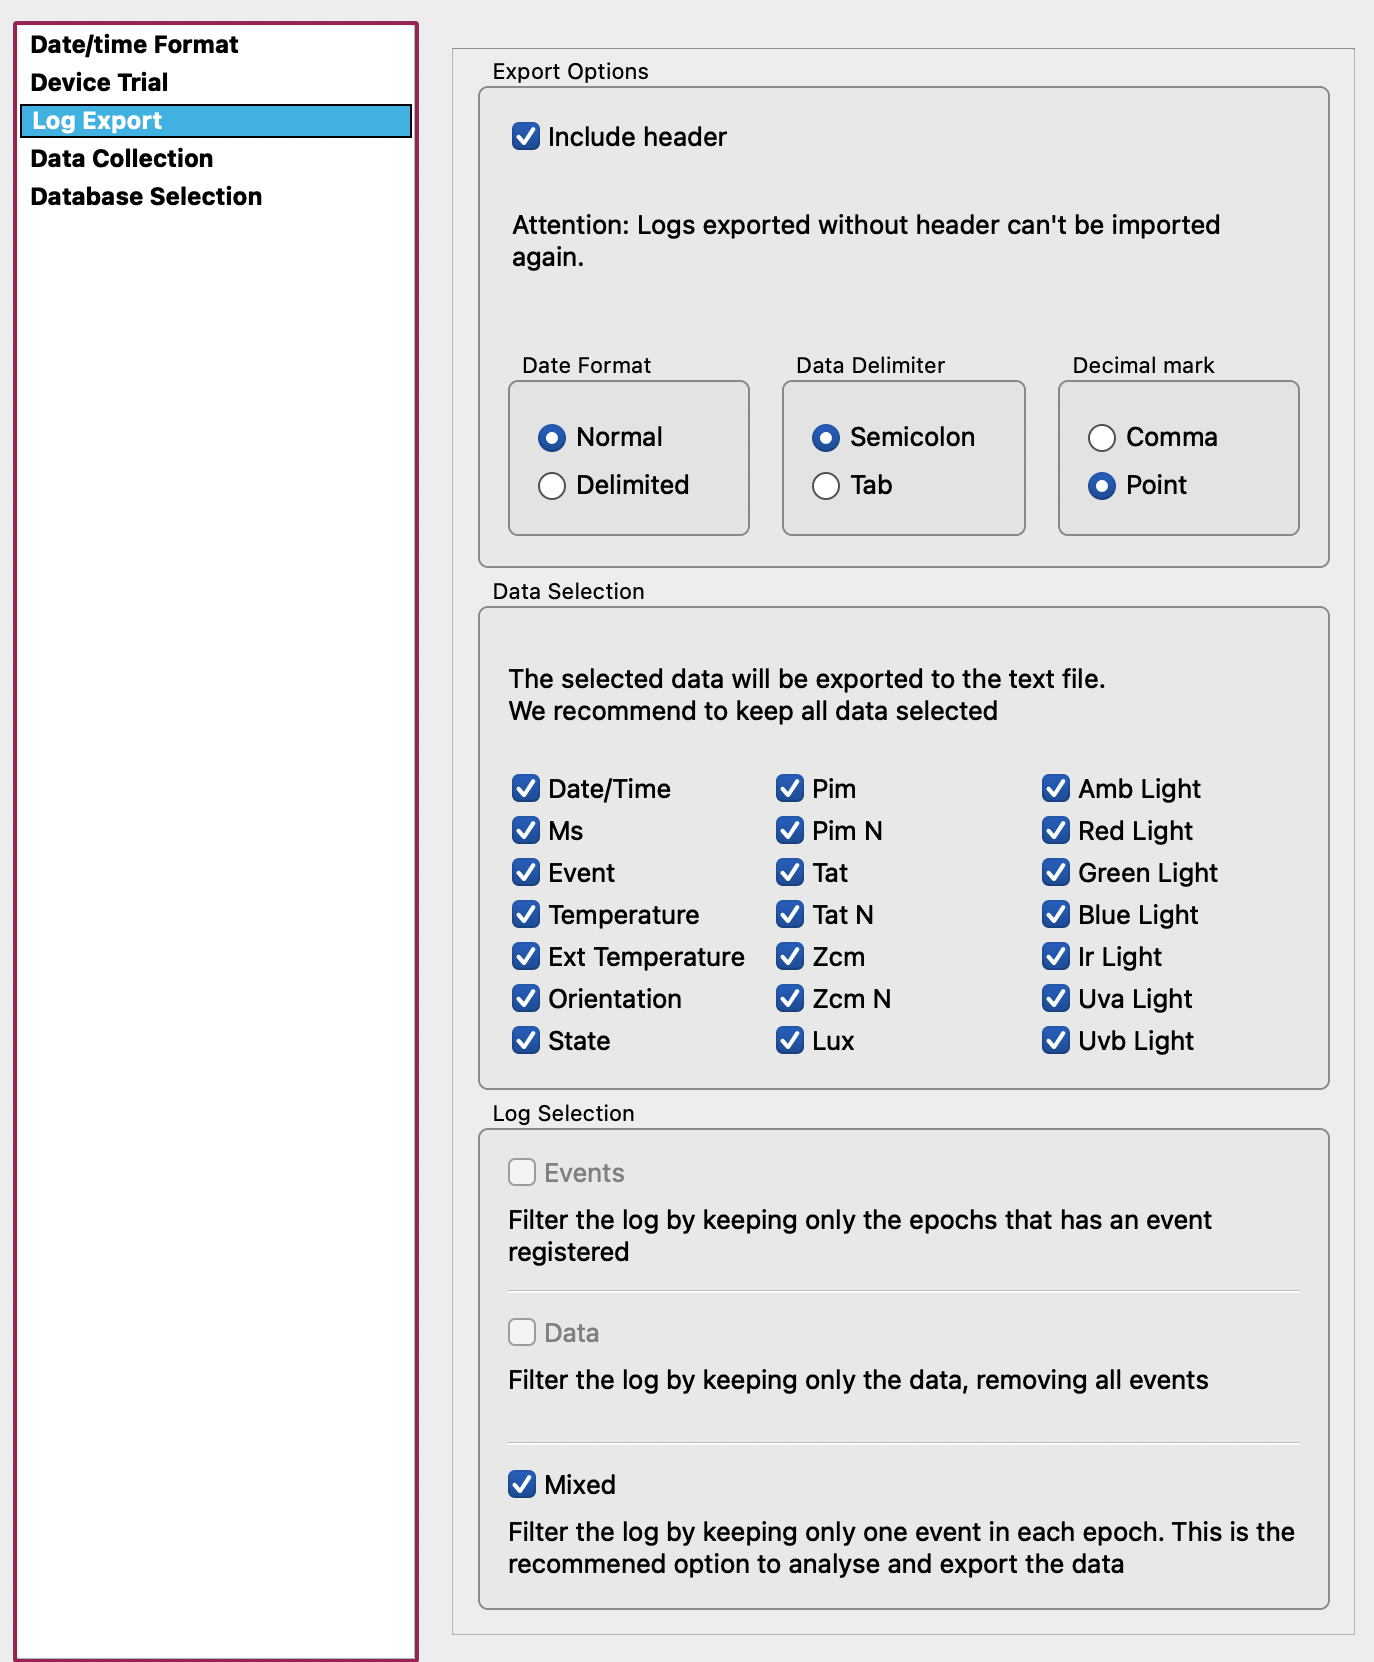
Change the default preferences by going to “configurations” at the bottom of the page > click on preferences
-
A new window appears: set the default preferences as discussed and click apply
- Note: The specific settings from acquisition are project-dependent and there is a trade-off between memory capacity and sampling. For most projects <1 month, 30 sec intervals are appropriate.
-
Default settings:
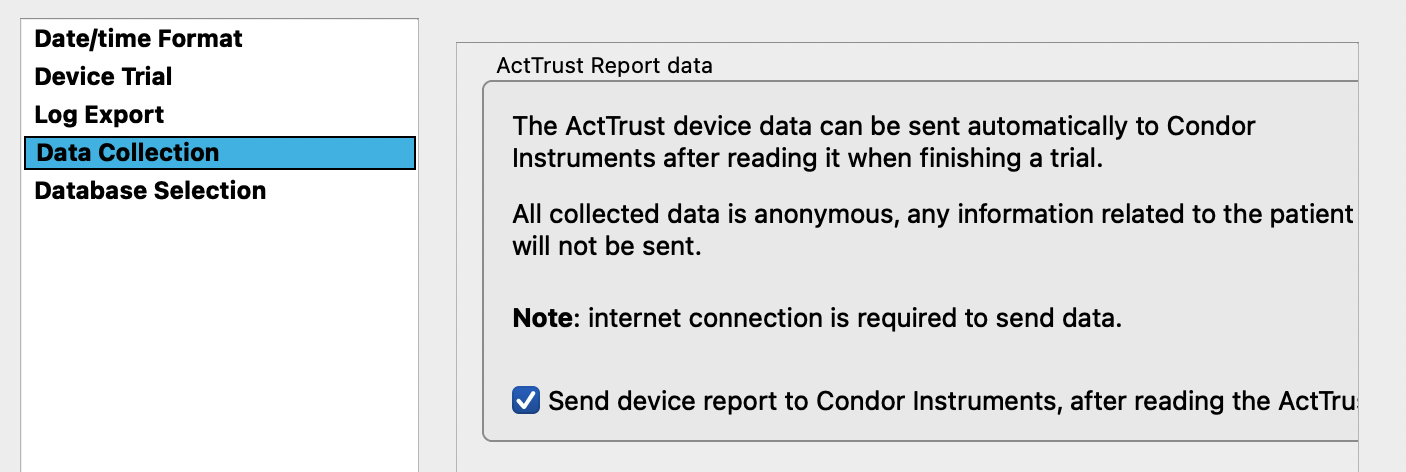
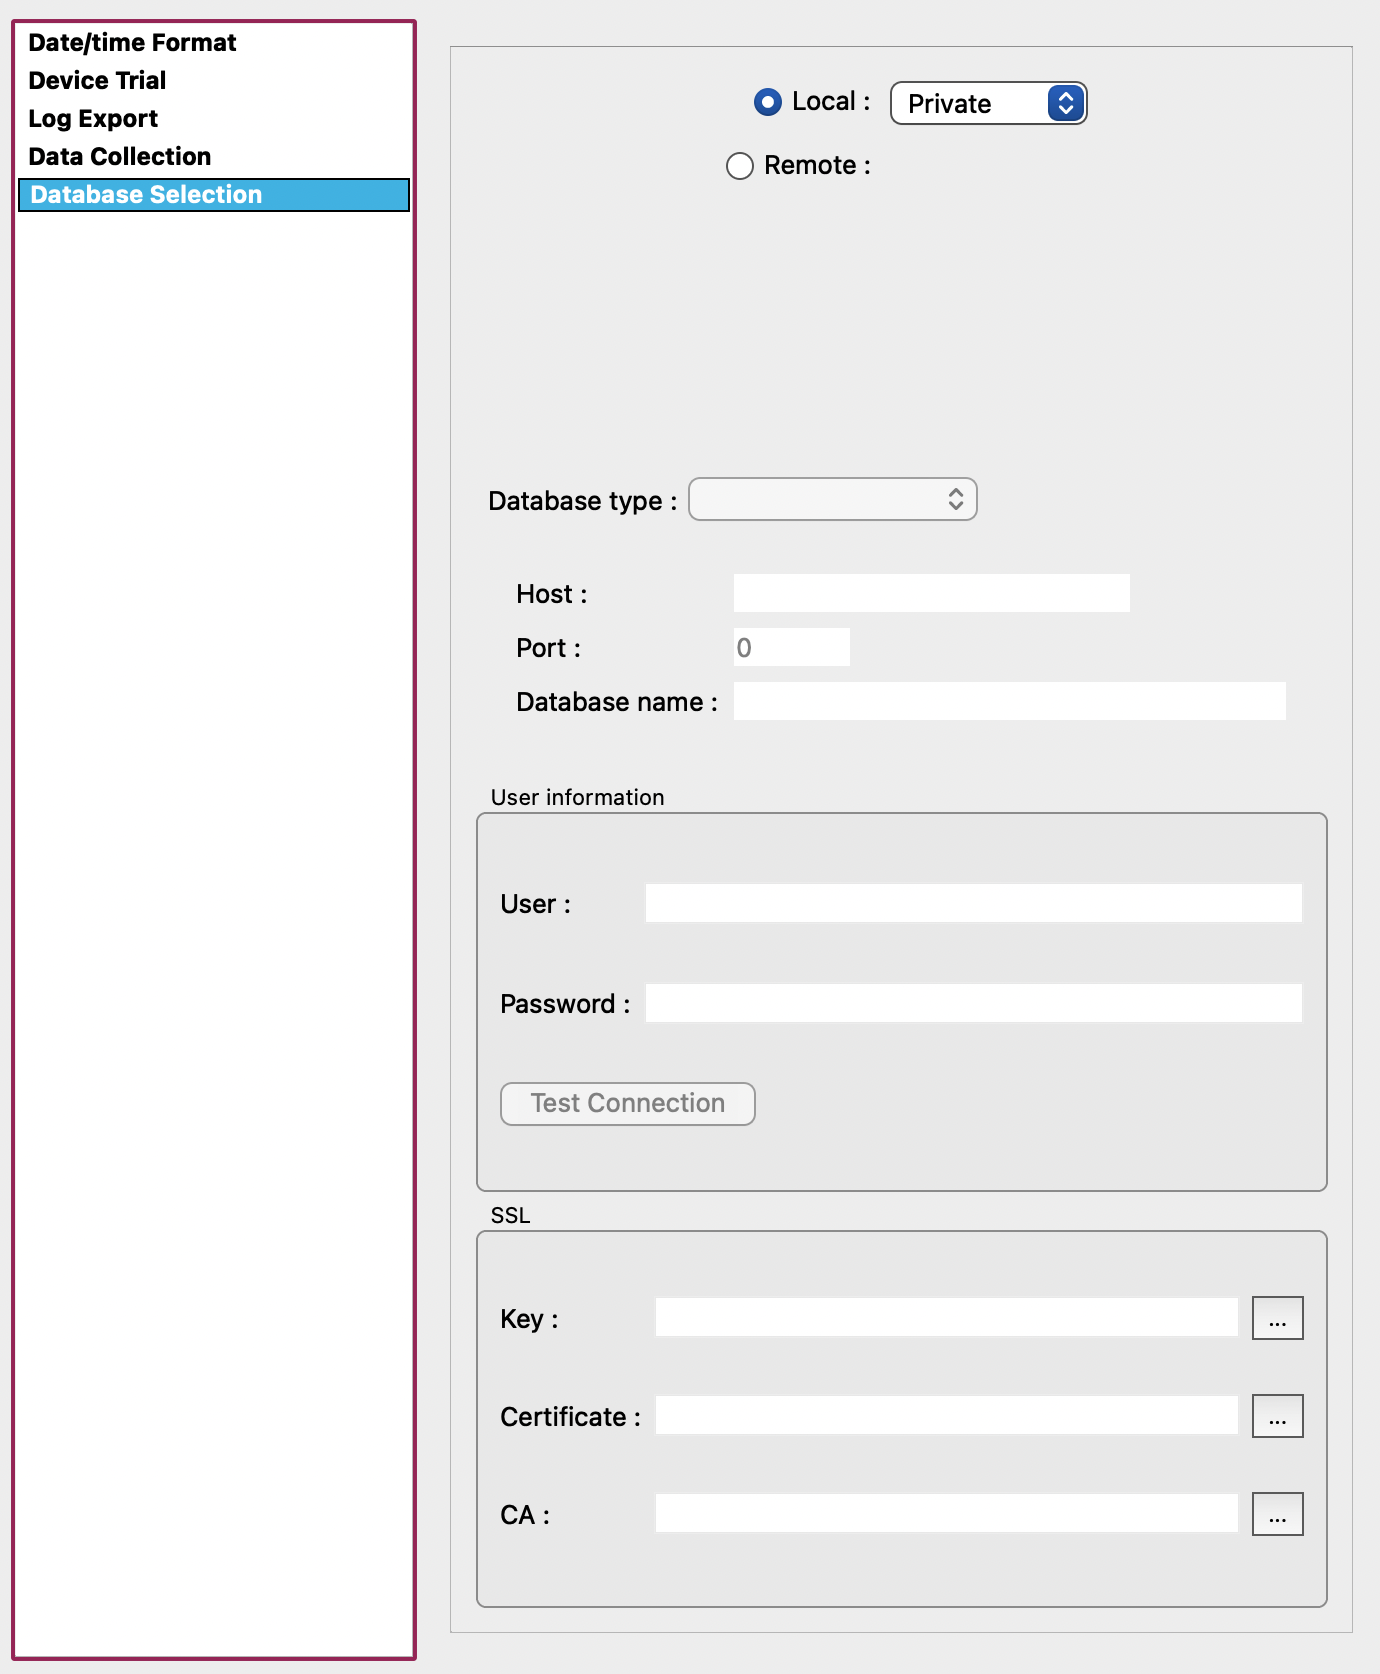
-
Check the battery status and charge if necessary (wait until battery status turned green and says “charged”)
-
Check if the system clock and the device clock are synchronised
-
Now click “Start Trial”
-
Check at the bottom under “configurations” if the “desired” settings are similar to the “current” settings
After disconnecting
- Note down in the Actimetry database that it was taken
- After the study, immediately connect the ActTrust so it stops recording
Data readout and download
- Place ActTrust device into the docking station and connect cable to laptop/computer
- Open ActStudio
- Check whether the device is connected
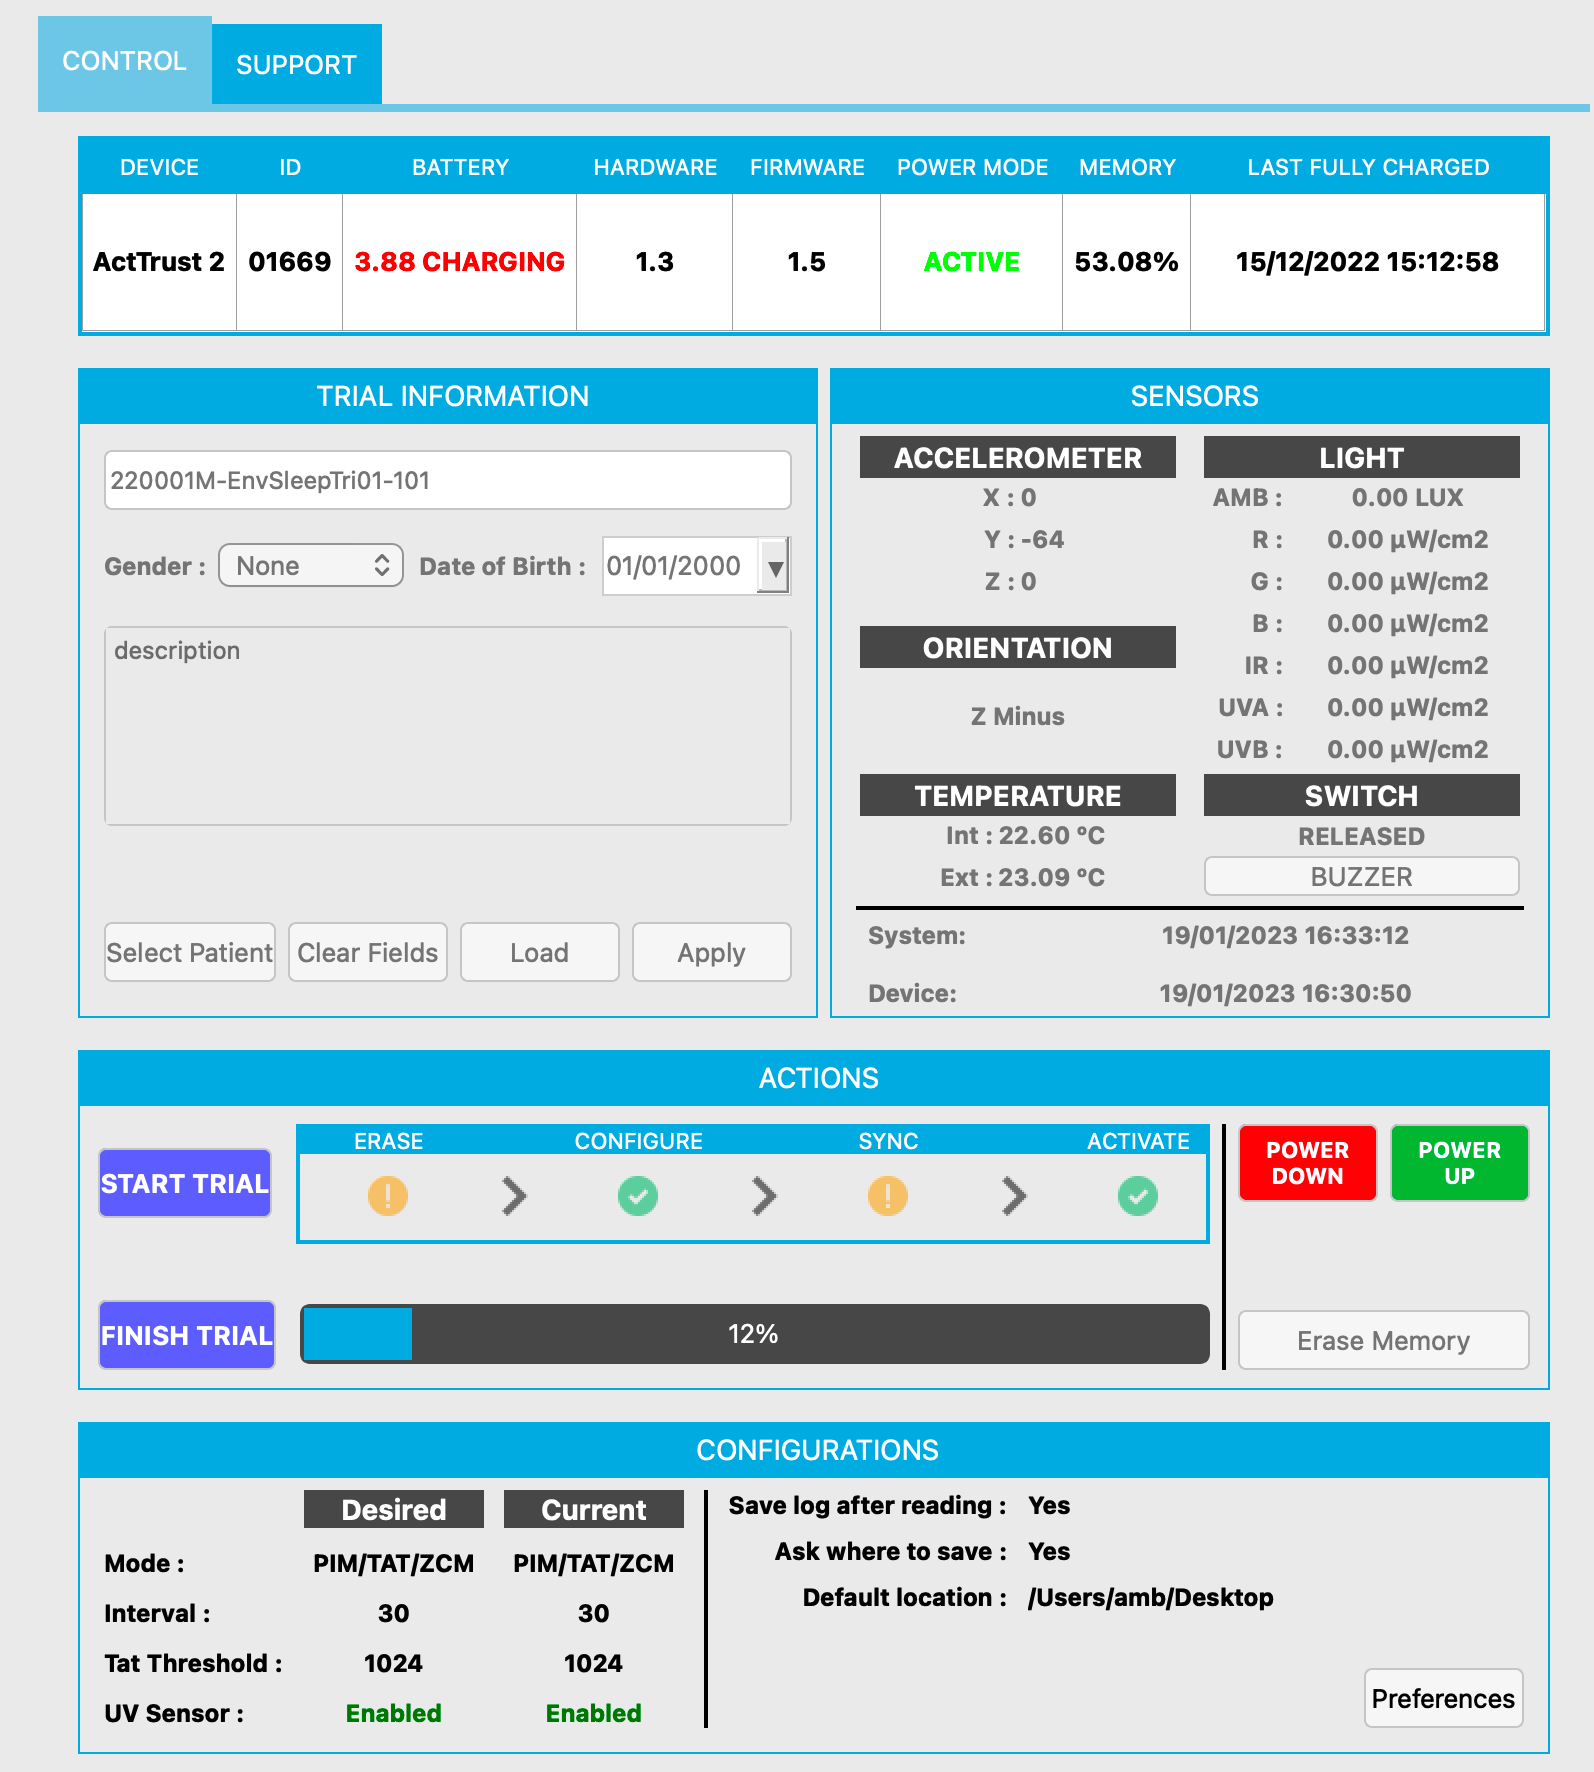
- Check the clock difference from the device and the internal time of your machine under “system” vs “device” on the right side > note this down!
- Click “Finish Trial” > this loads the data
- Wait until 100% is downloaded (check the progress bar)
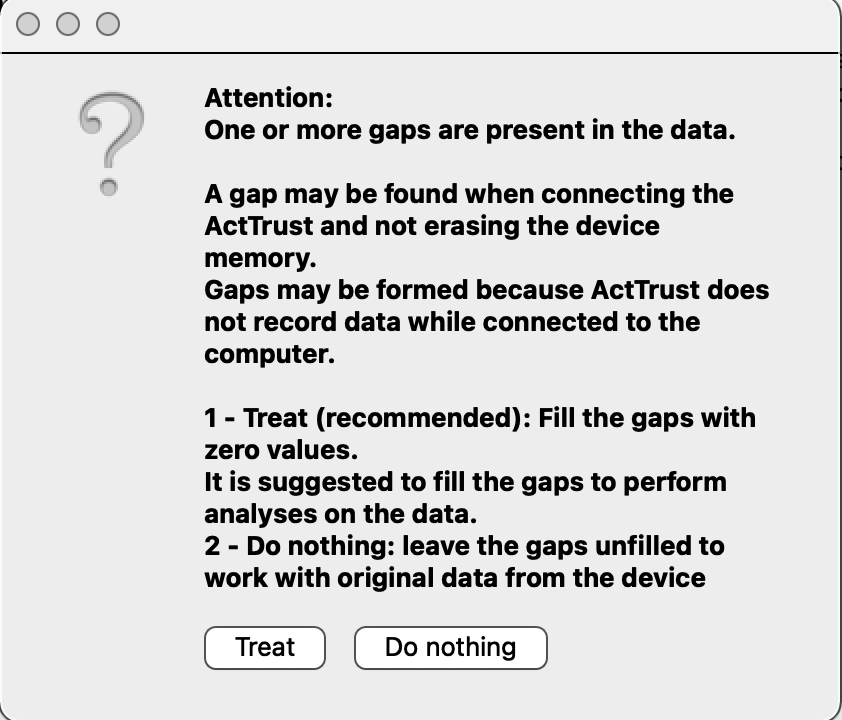
- In some cases: Possible a warning message appears which asks you whether you want to fill gaps in the data with 0s -> “Do nothing” to preserve missing periods of data (rather than imputing with 0). In a later analysis stage, this can be revisited and ActStudio will prompt you again.
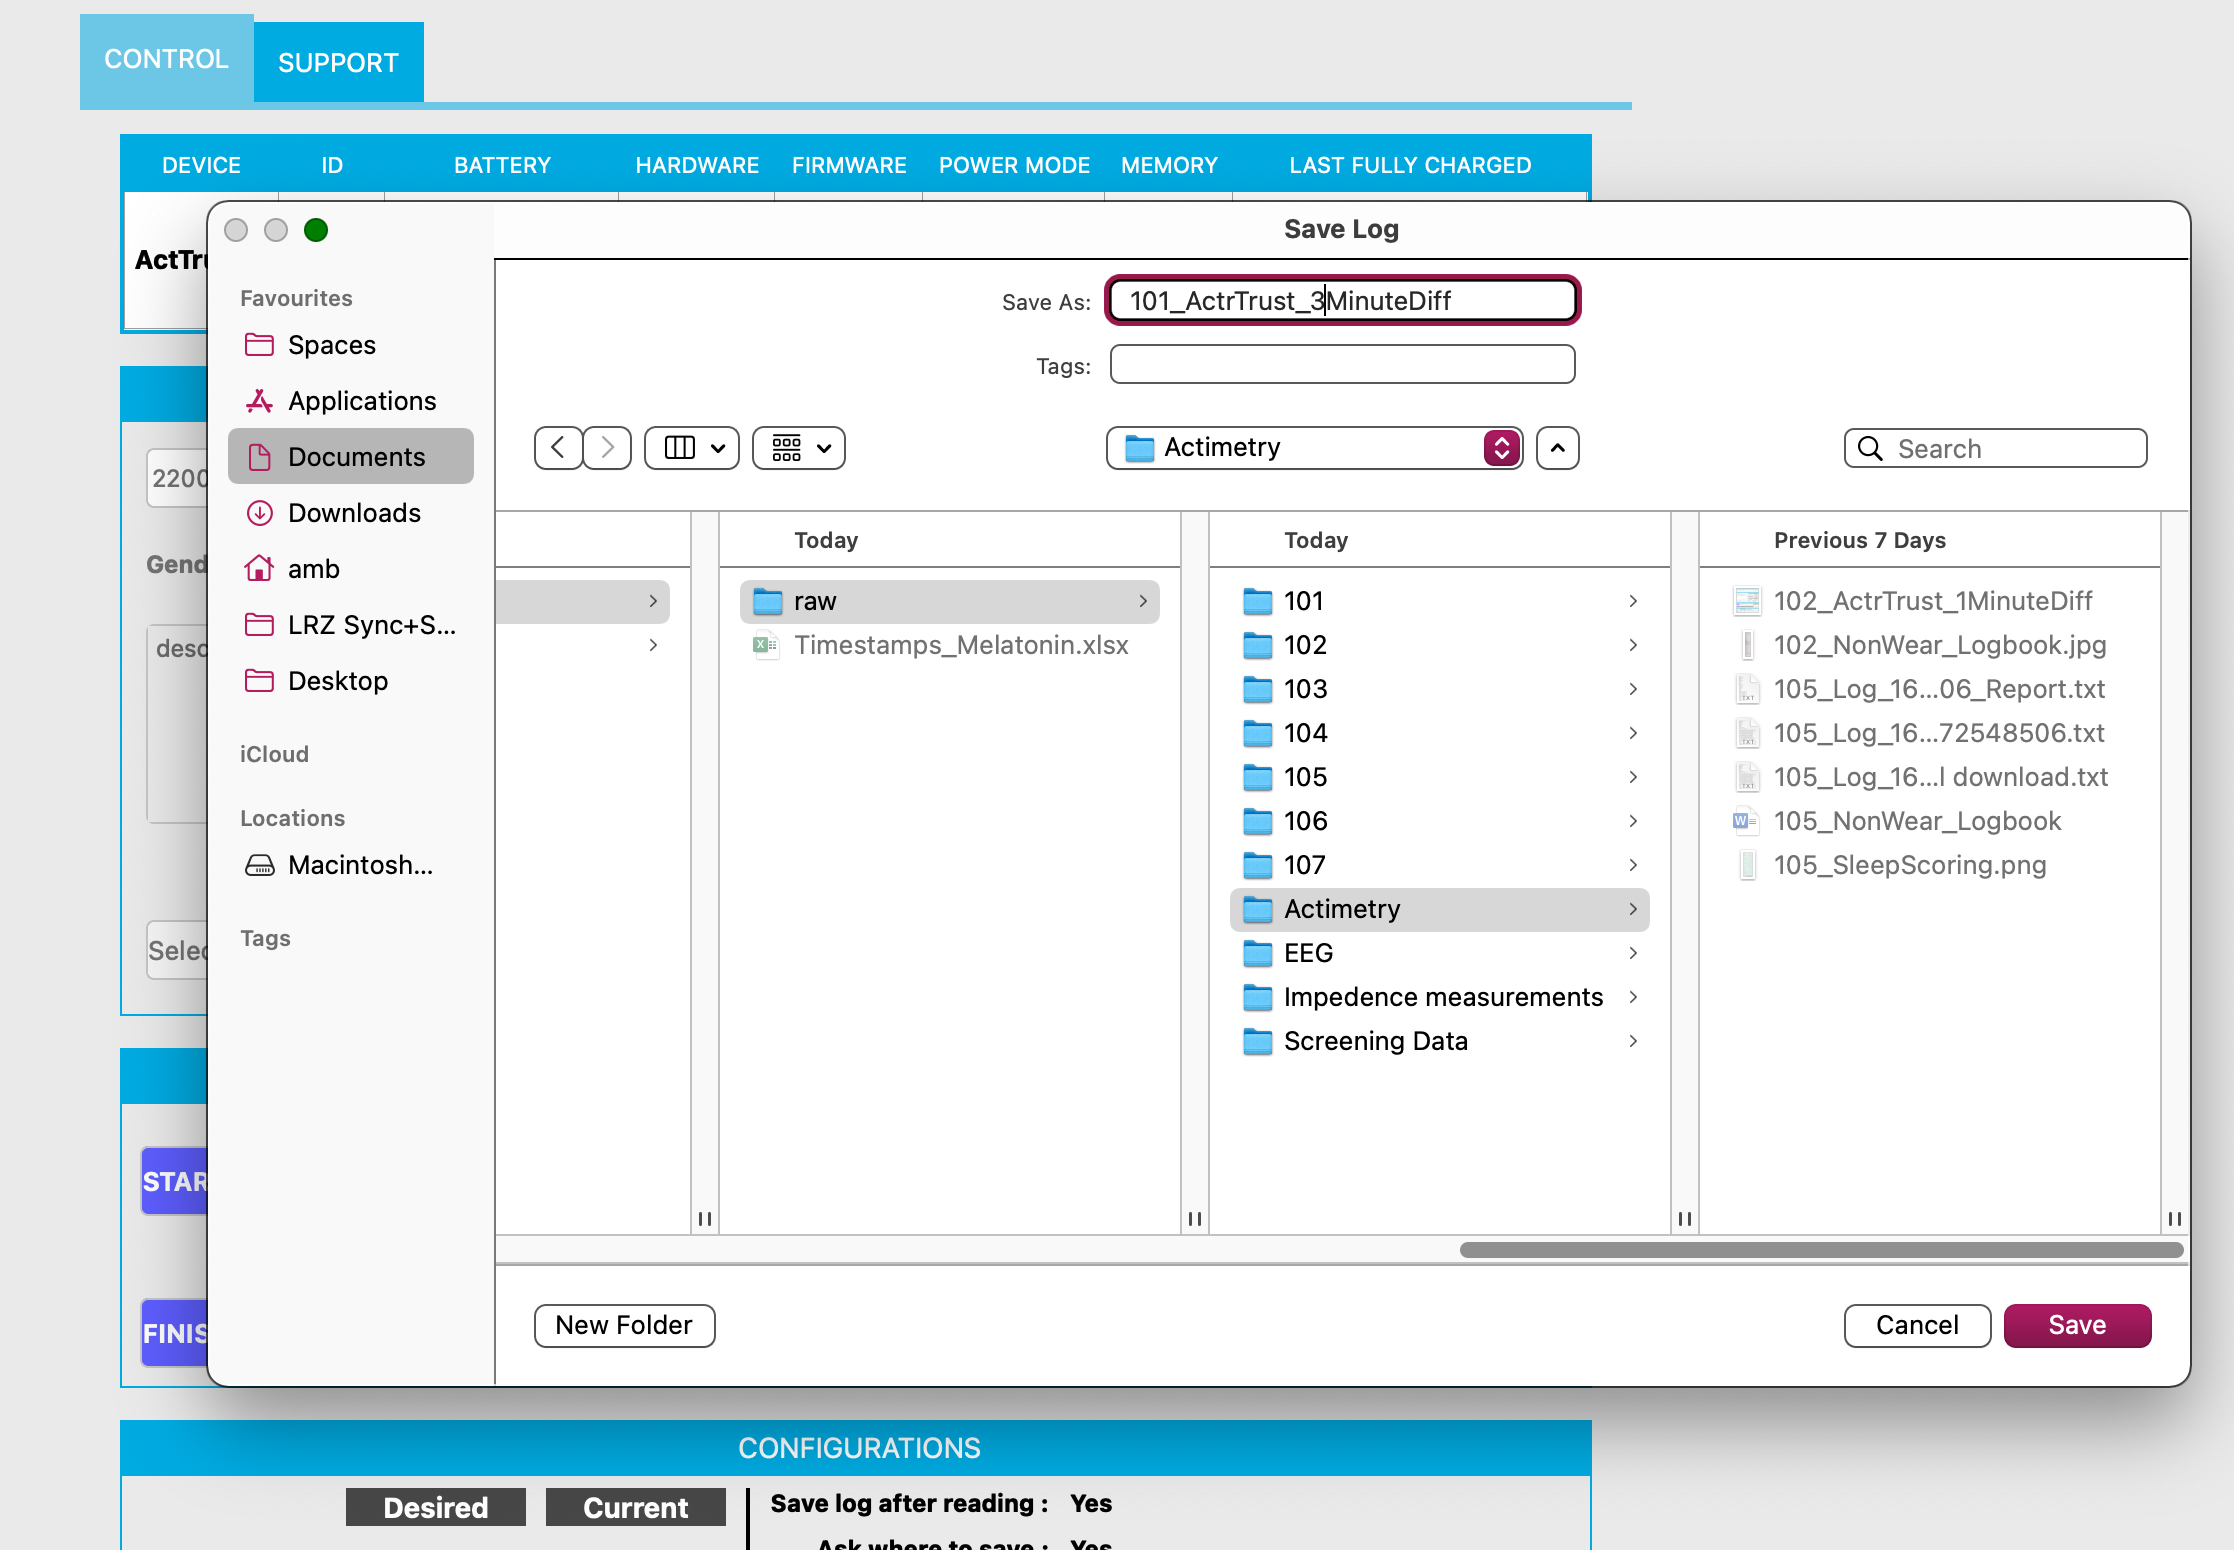
- A new window opens > specify the file name and the path where to save it; this saves the raw data
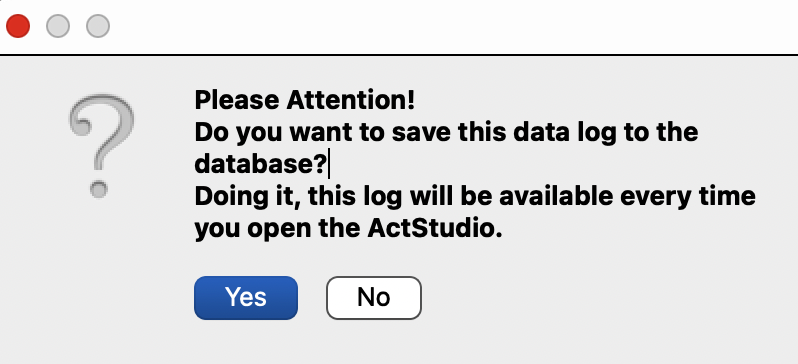
- Another window opens: “Please attention: Do you want to add the data to the log” > Click “Yes”. This stores the data in the local data base and you can always open it again without the need to upload the raw data file again
- Do NOT crop the data to valid periods in ActStudio by setting the initial and final times. Rather, this should be done with a separate file (start stop log file) to be loaded in pyActigraphy for example.
Visual inspection of data
-
Click on “Calculate Analysis”. This will generate metrics based on the data. This only has to be done once and the analyses will be available under “Analysis”.
-
Under “Analysis”, a lot of different data are depicted in line plots. For the initial visual inspection, it is sufficient to select “Activity”, “Sleeping”, “Resting”, “OffWrist” and “Light”.

-
Periods of “Awake” and “Sleep” will be scored by algorithm by ActStudio. You can change the type of algorithm in settings.
General notes
- View data in ActStudio, either for visual inspection or as a check that the data are there. For quantitative analyses, we will use pyActigraphy in the lab.
- Decide in advance on how to instruct pariticpants concerning the event button (use the button: yes/no; and for what: non-wear time, sleep onset and offset, ect).
Standard Operating Procedure for Mentalab Explore mobile EEG
| Device | Mentalab, Mentalab Explore EX8M |
|---|---|
| Objective | Acquire ambulatory EEG data |
| Owner | Laura Hainke |
| Reviewer | |
| Approver | |
| Contributors | |
| Version | 1.0.0 |
| Last edit | Laura Hainke |
| Date | 29.10.2023 |
Start up
Please refer to the manufacturer’s website for complete information on the product. Note that it describes the newer system version, though most of it also applies to the EX8M model.
EEG system core components:
- Amplifier: Mentalab Explore EX8M (8 channels, with memory)
- Software: download for Windows or Ubuntu (latest version)
- Set of 9 cables (different types available), attached to a connector specific to the amplifier.
- The connector has 10 pins, one of which is empty. The cable inserted into the pin on the opposite side of the connector is the system reference (REF); starting from there, the remaining electrodes are the active channels 1 - 8. This system does not have a ground (GND), since it is not attached to a power line.
Variant 1: wet EEG
- Cable set: ring gel type electrodes
- Cap (size M, L, or XL)
- Consumables: Ethanol, cotton sticks, abrasive gel, measurement band
- For short measurements: blunt syringe + conductive gel. For long (e.g., overnight) measurements: 10-20 paste
Variant 2: dry EEG
- Cable set: snap button
- Consumables: Ethanol, cotton sticks, abrasive gel, cotton pads, disposable “stick & peel” electrodes, tape
How to start the system:
- Connect the amplifier to a power source using a micro USB cable. Charge it fully for up to 3 hours.
- Disconnect the device from the power source and press the button once to turn it on. The device LED should blink once in green, then start blinking in blue, indicating it is ready for Bluetooth pairing.
- On your computer, which must have the software installed and a working Bluetooth module, open the Explore Desktop app.
- Enter the device ID and press Enter. You can find it on the back of the amplifier, it is composed of the last 4 characters on the printed sticker (e.g., 82X9).
- Either a pop-up will appear asking for your permission to establish Bluetooth connection, or you will have to add the device manually in your Bluetooth menu.
- The Explore Desktop app will move to the settings page as soon as the device has established Bluetooth connection.
Preparation
General rule: communicate with your subject. Some people may complain about EEG setups, e.g., due to skin sensitivity. In that case, be more gentle when cleaning their skin.
Wet EEG:
- To prepare the cap, take the ring electrode set and thread the cables through the larger cap holes, to limit cable movement. Press the rings into the smaller holes of the cap until fixated. Note that the first electrode of the set is the system reference. Each small hole is marked with an EEG position according to the 10-10 system.
- Put the cap which most closely matches the subject’s head size on their head. Fasten the velcro strap over the chin. It should be as tight as possible, without making the subject too uncomfortable.
- Extend the measuring band from nasion (between the eyebrows) to inion (the base of the bone at the back of the skull). Adjust the cap so that the Cz electrode is in the middle. Then, measure from ear tip to ear tip; adjust the cap so that the Cz electrode is in the middle.
- Insert the cable connector into the amplifier until it clicks (there is a correct up- and downside of the connector). The amplifier can be attached to the cap using a velcro patch, or to any fabric using a clip.
- Preparing electrodes:
- Lift the electrode + surrounding cap fabric slightly. Clean the underlying skin with a cotton stick dipped in Ethanol, then dip it in abrasive gel and scrub the skin, moving some hair away if possible from underneath the electrode.
- If using a syringe and gel, place the blunt tip underneath the electrode and apply gel. If using 10-20 paste, apply some directly onto the inside of the electrode. Press the electrode onto the scalp.
- The gel or paste should fill the electrode and reach the scalp, but not overflow visibly around the electrode.
Dry EEG:
- “Stick & peel” electrodes only stick to bare skin. If needed, adapt the positions of choice according to the subject’s facial or body hair.
- Clip the electrodes into the snap buttons beforehand.
- Fixate the cables to the skin or to the clothes, to limit cable movement.
- Preparing electrodes:
- Clean the position with a cotton stick dipped in Ethanol, then dip it in abrasive gel and scrub the skin carefully. Remove the abrasive gel with a dry cotton pad (else, the electrode may not stick).
- Remove the cover of the disposable electrode and press it onto the cleaned location.
After the setup:
- Go to the impedances tab in the Explore Desktop app. Choose wet or dry in the dropdown, then check the values. Green values are desirable.
- For wet EEG, impedances should be < 10 kOhm, ideally < 5 kOhm. If the value is higher for any electrode, try to clean the spot more thoroughly using some more abrasive gel, and apply more gel/paste.
- For dry EEG, there is no consensus. < 100 kOhm is usually good.
- Go to the signal visualization tab. Ask the subject to lean back and relax. Check if any channel is particularly noisy. If all channels seem noisy, or all impedances are high (in the case of wet EEG), the reference channel requires more thorough preparation.
- Sanity check: ask the subject to blink their eyes a few times, then clench their teeth, then close their eyes. You should be able to see the artifacts and the shift to alpha activity, in most cases.
Recording Procedure
Variant A: recording to system memory
- Go to the settings tab. Click on “format memory” to wipe the system memory clean, so the recording contains almost exclusively relevant data. Taking this step deletes the data recorded during setup and impedance measurement.
- Note: The system initializes a new data file and starts recording to the internal memory as soon as it is switched on. The data file will be filled until the device is switched off.
- If desired, change the sampling rate. 250 Hz is the default; 500 Hz or 1000 Hz are possible.
- Close the app and start the experiment. The device will leave Bluetooth mode and move to offline recording only.
Variant B: recording to PC
- If desired, change the sampling rate. Channel names can also be changed (e.g., from “1” to “Cz”).
- Go to the signal visualization tab. In the pop-up, enter your filter settings; note that they apply only to the visualization, the signal recorded is always the raw data. Press record, enter a folder and filename. Press stop when the trial is over; repeat as needed.
- Important: the Bluetooth range is about 10 m, but Bluetooth interference can easily happen indoors. The higher the sampling rate, the more problematic this will be. Having the subject + system and the recording PC in separate rooms is a bad idea. In general, recording onto the memory is preferable. If inconvenient, test your setup well beforehand.
How to get good quality data (depends on the experimental setup):
- Ask the subject to remain as calm and relaxed as possible. Explain that speaking, moving, teeth clenching, and muscle tension are electric activity, captured by the system on top of brain activity.
- If your experiment is longer than 1 hour and you are using wet EEG, check impedances every 1-2 hours. Apply more paste when needed, as it may dry up. Disposable electrodes usually prevent this issue.
- If the task given to subjects takes more than a few minutes or is not very engaging, make sure to take breaks and keep them alert.
When the experiment is terminated, turn off the amplifier by pressing the button until the LED blinks in red 3x.
Data Saving
This applies only to variant A; in variant B, the files are already in the folder you specified.
- Make sure the amplifier has been turned off. The LED should be off. Connecting the device to a power source while still recording will result in a corrupted data file!
- Connect the device to your PC using a micro-USB cable that is appropriate for data transfer. Look for the Explore device in the list of connected external drivers and open the folder.
- In the folder, you will find one or more files, with the name pattern DATA[3 digits].BIN. If you have cleared the memory beforehand, there should only be one file, named DATA000.BIN. The longer you record, the larger the file will be. If there are multiple files, consider file size and order to determine which one corresponds to your recording period.
- Example: you’ve turned the device on to check if all is well, then turned it off again. Then, without clearing the internal memory, you have recorded until full capacity was almost reached, then turned it off. Lastly, you turned it on and off again by accident. Result: your folder will contain 3 data files. Only the middle one contains the data you want and will have a size considerably larger than the others.
- Recommendation: Every time you record a period meaningful for your experiment onto the memory, save the data and clear the memory before starting the next period.
Terminating
Resetting the system for the next recording:
- Make sure the device is turned off, then leave it to charge for about 3 hours to fill the battery.
- When turning the device back on, it may blink in pink a few times, before shutting down automatically. This indicates the memory is filled over a certain threshold. To continue, restart the device. If you are sure you have backed up the data, double-click the button during the period of blink flashes; this will wipe the memory clean. If you are unsure, let the device shut down, back up the data, and repeat.
Cleaning the equipment:
- Wet EEG: Remove the electrodes from the cap. Clean the cap with water and soap, leave it to dry or blow-dry. Clean the electrodes with a brush under running water, being careful not to scratch the inner metal parts. Do not expose the connector to water, it may be damaged over time.
- Dry EEG: Detach the disposable electrodes and throw them away. Disinfect the cables if needed.
This chapter contains information about the standard operating procedure for our pupillometry device: NVBL, created to measure pupil size.
Metropsis
| Measurement | Salivary samples |
|---|---|
| Objective | Defining dietary guidelines prior to saliva sample collection |
| Owner | Carolina Guidolin |
| Reviewer | |
| Approver | |
| Contributors | Carolina Guidolin |
| Version | 1.0.0 |
| Last edit | Carolina Guidolin |
| Date | 20241119 |
Dietary considerations for saliva data collection
Note: The below are indications for planning experiments. They are not participant-facing instructions, as these need to be adapted for each study.
Throughout the study period
Throughout the study period, participants should abstain from:
- Melatonin in any form, including as tablets, sprays, gummy bears, supplements or other forms
- Sleep aids or supplements of any kind
- Antihistamines
- Other medications, including NSAIDs
On the day of the experimental session
On the day of an experimental evening session, the following foods should not be consumed after 15:00:
- Bananas
- Walnuts
- Pistachios
- Pineapple
- Sour cherries
- Salmon
- Chocolate
- Any coloured candy or gum
Meal provision in the laboratory
In case participants will be provided a meal at the beginning of the experimental evening session, this meal should be completed latest 30 minutes before the first saliva sample, and it should not contain the following ingredients:
- Banana
- Walnuts
- Pistachios
- Pineapple
- Sour cherries
- Salmon
- Tomates
- Turkey
- Citrus fruits, e.g. lemons or oranges
After meal consumption, participants should rinse their mouth with water to wash out any remaining food particles. This should be done max. 10 minutes before the next saliva sample.
Caffeinated drinks
Guidelines on caffeinated food and drinks vary from experiment to experiment and participants are instructed accordingly. The following items are to be avoided:
- Coffee drinks
- Caffeine pills
- Energy drinks
- Yerba mate drinks
- Black tea, green tea, white tea
- Cola drinks (e.g., Coca-Cola, Pepsi)
- Chocolate (milk and dark)
General considerations
Alcohol should generally be avoided during the study period.
Ocular physiology measurements
This chapter contains SOPs and documentation for devices dedicated for characterising and quantifying the physiology of the eye and the retina.
| Device | Topcon 2000 OCT |
|---|---|
| Objective | Measuring ocular physiology |
| Owner | Hannah S. Heinrichs |
| Reviewer | |
| Approver | |
| Contributors | Hannah S. Heinrichs |
| Version | 1.0.0 |
| Last edit | Hannah S. Heinrichs |
| Date | 11.11.2022 |
Start up
-
Checklist
- OCT device
- Distance holder for forehead
- Desktop PC is connected
- Desinfecting cloths
-
Start up system
- Turn on Power under table and on the side of OCT
- Start up Computer
- Open Program OCT
- Register new participant with ID
- Open “Capture”
- Start general followed by specific procedures
General
-
Desinfect the chin rest
-
Invite participant to take a seat.
-
Switch off light
I am now going to switch. Are you ready for the experiments or do you have any questions?
Ich werde jetzt das Licht ausschalten. Sind Sie bereit für die Messungen oder haben Sie noch fragen?
-
Press “Capture” in Software
-
Adapt table
-
Adapt chin rest (eyes on height of mark)
-
Participant instruction (EN/DE):
We will take X different images. For each image please focus either in the middle or at the green square.
Wir werden verschiedenen Bilder aufnehmen. Schauen Sie währenddessen bitte entweder in die Mitte oder auf das grüne Quadrat.
Procedure pre-experiment data collection
Corneal thickness (pre-session)
- Setup
- First put distance holder to forehead
- Select “ANTERIOR > Radial Anterior Seg.”
- Select “Color” → no Fundus photography
- Get image
- Right image:
- Horizontal line in the middle of the pupil and at pupil reflex
- Left image:
- Horizontal line AND vertical line (light relex) should be in yellow square
- Right image:
- Press button to take image
Fundus photography (pre-session)
- Setup
- No distance holder
- Select “FOTO > Fundus Photo”
- Select “ON S. Pupil”
- Select “C Fix. Pos”
- Instruction:
- “Please focus on the green square”
- Move into the pupil until you see the fundus
- Press button to take image
Procedure during experiment
Macula image
- Setup
- No distance holder
- Select “MACULA > 3D Macula 6.0x6.0” (2. button)
- Select “ON S. Pupil” → corrects for small pupil
- De-select “Color” → no Fundus photography
- De-select OCT-LFV → no overlay image
- Instruction
- “Please focus at the green square”
- right eye: “you may have to look a little bit to the left”
- Position square at middle of pupil, find 2 white dots
- screw joy stick for up-down-movement
- horizontal line on pupil reflex
- Move in with body until you see back of fundus
- And find 2 dots gain → move into brackets
- check and adapt illumination
- adjust slightly with joy stick
- move further into eye to focus bring points together
- Align 2 rectangles should be on top of each other
- Press [Optimize]
- Adjust with wheel on right side further
- De-select OCT-LTF (ged rid of overlay)
Optic disc image
- Setup
- No distance holder
- Select “GLAUCOME > 3D Disc”
- Select “ON S. Pupil” → corrects for small pupil
- De-select “Color” → no Fundus photography
- De-select OCT-LFV → no overlay image
- Get image
- Pupil in the middle of the red square
- Pupil reflex should be in the middle of brackets
- Move into the pupil until you see optic disc
- Find 2 bright dots, bring them together
- Align 2 rectangles
- with wheel on the right
- press [Optimize] button
- Check bar for image quality should be > 50, quality of < 45 can’t bu used.
- Press button on joy stick to take image
- Image quality control (QC)
- Excavation must be down, otherwise you were too far in
Corneal thickness
- Setup
- First put distance holder to forehead
- Select “ANTERIOR > Radial Anterior Seg.”
- De-select “Color” → Fundus photography
- Get image
- Right image:
- Horizontal line in the middle of the pupil and at pupil reflex
- Left image:
- Horizontal line AND vertical line (light relex) should be in yellow square
- Right image:
- Press button to take image
Data Saving at OCT
Routine to save data.
- Transfer to Server
Requirements (may be skipped)
- OCT Data Collection Software
- can be found here: HiDrive.zip
- To download, unzip files
- Go to “HiDrive” > “OCTDataCollectorInstaller”…
- Install software on windows by clicking “OCTDatacollectorInstaller.msi”
- The programm will be linked on the desktop
0. Have a look at the Manual
1. Save DICOM and PDF output
The OCT machine has to be on in order to access the software on the computer
-
In the 3DOCT GUI, click on the participant and select one of the three different measurement output (Macula, Disc, Anterior)
-
For each of the measurement….
-
Click on “View” in the side pane
-
On the menu bar go to “Export” > “Export DCM file”, save file as specified.

-
Click on “Report” on the side pane and the “Export” button, save file as specified

-
You can chose the folder when saving files, please be careful to export the files in the right folder.
When saving files, please respect this template : C:\test_oct
- macula
- data - .csv files
- dicom - .dcm files
- img - .pdf files
- disc
- data - .csv files
- dicom - .dcm files
- img - .pdf files
- cornea
- data - .csv files
- dicom - .dcm files
- img - .pdf files
-
2. Save CSV file with OCT data
-
Open the the OCT Data Collector program

-
As Data folder select:
D:\3DOCT\data -
Press “Search” → in folder the .fda files are stored. Die FDA files contain all relevant information.
-
Follow the instructions given by the following Manuel (download docx from above) and consider:
- Reference data:
- Select:
D:\3DOCT\datain which the .fda files are stored. Die FDA files contain all relevant information. - Select MACULA, DISC and EXTERNAL (for cornea) files of the participant so that they appear in the table
- Select:
- Export File
- Save data in the following folder
C:\Users\mspitschan-admin\Documents\oct_data - As prefix specify date and time in the following format
[YYYYMMDD]_[HHMMSS]_[ID]
- Save data in the following folder
- Reference data:
Check complete files
- Check if CSV files have been saved
- 4 .csv files must have been create with the following format:
[YYYYMMDD]_[HHMMSS]_3D_DISC.csv[YYYYMMDD]_[HHMMSS]_3D_MACULA(6x6GRUD).csv[YYYYMMDD]_[HHMMSS]_3D_MACULA(ETDRS).csv[YYYYMMDD]_[HHMMSS]_3D_ANTERIOR.csv
- 4 .csv files must have been create with the following format:
- Check if DICOM and PDF have been saved
- 8 .dcm files and 6 .pdf files in different folders, one for each of the measurements (please respect the following template when saving files) :
- cornea
- data
oct__3D_ANTERIOR.csv
- dicoms
[ID]_[YYYYMMDD]_[HHMMSS]_OP_R_001.dcm[ID]_[YYYYMMDD]_[HHMMSS]_OP_L_001.dcm- …
- img
[ID]_[YYYYMMDD]_[HHMMSS]_OCTReport_R_001.pdf[ID]_[YYYYMMDD]_[HHMMSS]_OCTReport_L_001.pdf- …
- data
- macula
- data
.csv
- dicoms
[ID]_[YYYYMMDD]_[HHMMSS]_OP_R_001.dcm[ID]_[YYYYMMDD]_[HHMMSS]_OP_L_001.dcm[ID]_[YYYYMMDD]_[HHMMSS]_OPT_R_001.dcm[ID]_[YYYYMMDD]_[HHMMSS]_OPT_L_001.dcm- …
- img
[ID]_[YYYYMMDD]_[HHMMSS]_OCTReport_R_001.pdf[ID]_[YYYYMMDD]_[HHMMSS]_OCTReport_L_001.pdf- …
- data
- disc
- data
.csv
- dicoms
[ID]_[YYYYMMDD]_[HHMMSS]_OP_R_001.dcm[ID]_[YYYYMMDD]_[HHMMSS]_OP_L_001.dcm- …
- img
[ID]_[YYYYMMDD]_[HHMMSS]_OCTReport_R_001.pdf[ID]_[YYYYMMDD]_[HHMMSS]_OCTReport_L_001.pdf- …
- data
- cornea
- 8 .dcm files and 6 .pdf files in different folders, one for each of the measurements (please respect the following template when saving files) :
3. Transfer to Server
...
Shut down
- Shut down OCT and PC
- Clean chin rest
- Put on cap on the lens of the OCT
- Put on cover for dusk protection
- Turn off energy device under the table
Light measurements
Go Pro Hero10
Circadiometer WP 690
Actigraph Condor
General measurement procedure ReWoCap
Intel RealSense depth camera D455
Spectoradiometer 1511 Jeti
Colorimeter Klein.md
Testo 175 H1
How Tos
This section contains How To's for software and devices.
Embed the link to your how to at Template structure.
Template structure
GitHub pull request tutorial
Once you have created your github account, you have acces to many options :
- Create repositories
- Access other repositories
- Request pulls
Here we will look at pull requests :
First steps
For this you will have to go on github.com on your browser
- First things first go to the main repository you want to work on :

We will be working on the MPI-tSCN’s repository called “Templates” (see on top left of the screenshot)
The easiest way is to do the changes and the pull request online
- You will have to fork the repository you want to work on :
- At the top right click on “fork”, I have already forked this repository so it shows it as “
/<fork_name>
- At the top right click on “fork”, I have already forked this repository so it shows it as “
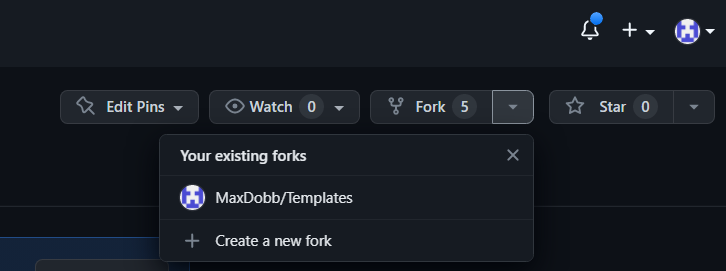
- Once you forked the repository, go to YOUR repository by clicking on your profile picture on the top right of the webpage, you will then see your personal repositories :
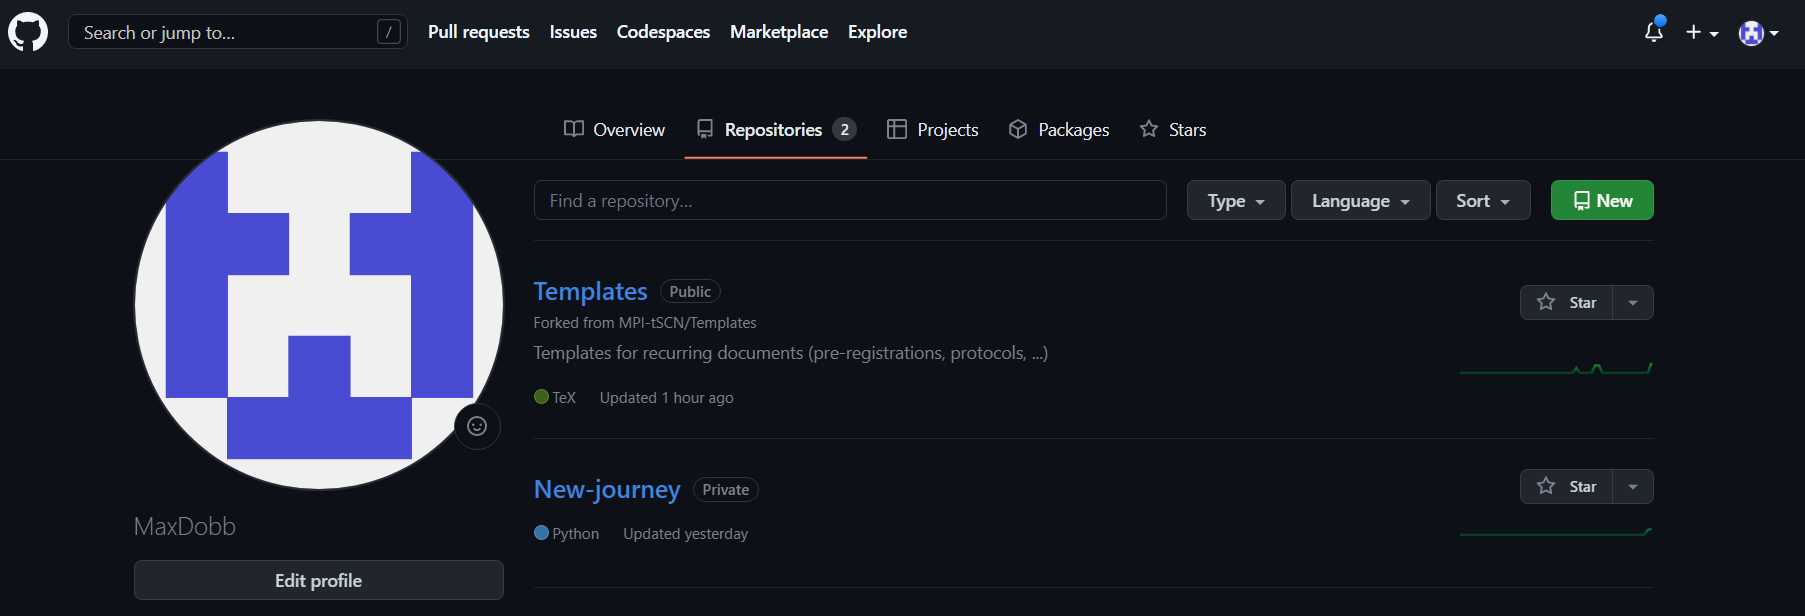
- If you now click on “Templates”, it will open the fork, a copy, of the repository you want to modify
- You can now modify “Templates” in your private repositories WITHOUT interacting with the main “Templates” branch
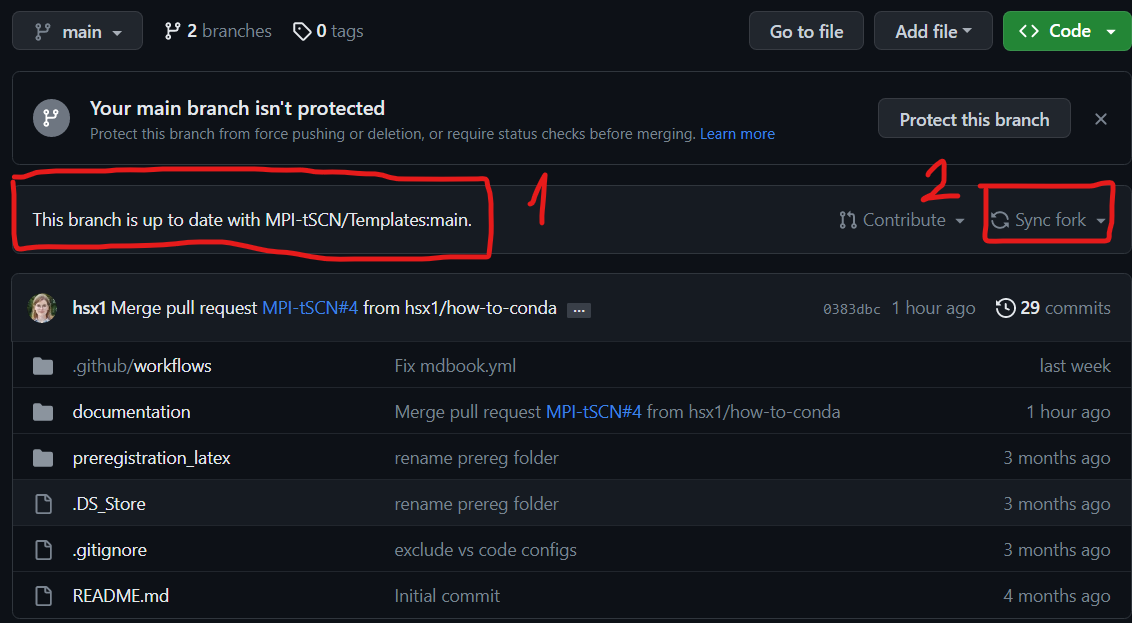 Always make sure that your forked branch is up to date with the main one, if not go to “Sync fork”
- You can now modify “Templates” in your private repositories WITHOUT interacting with the main “Templates” branch
- You now have an up to date modifiable version of the protected main branch
Now you are free to modify whatever you would like to, let’s say I want to edit the markdown file under Templates/Documentation/src/how-tos/conda/conda.md

You can check in the ‘1’ area that you are in your personal repository and not the main branch. The ‘2’ area is used to edit the file.
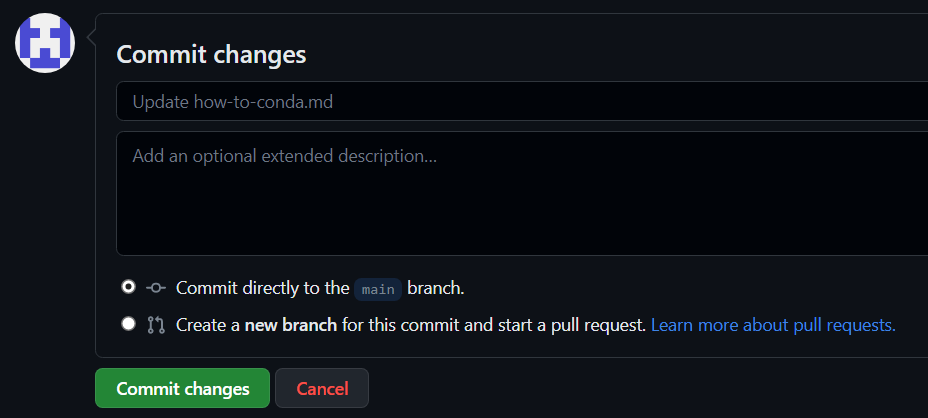
- Click on the pen marked ‘2’ on the screen above and modify the document as you please. Once it’s done : scroll down and do click on “commit changes”
Add files or documents
let’s say you want to add a file under Templates/Documentation/src/how-to-conda/
- simply go to the “add file” section and “Upload file”
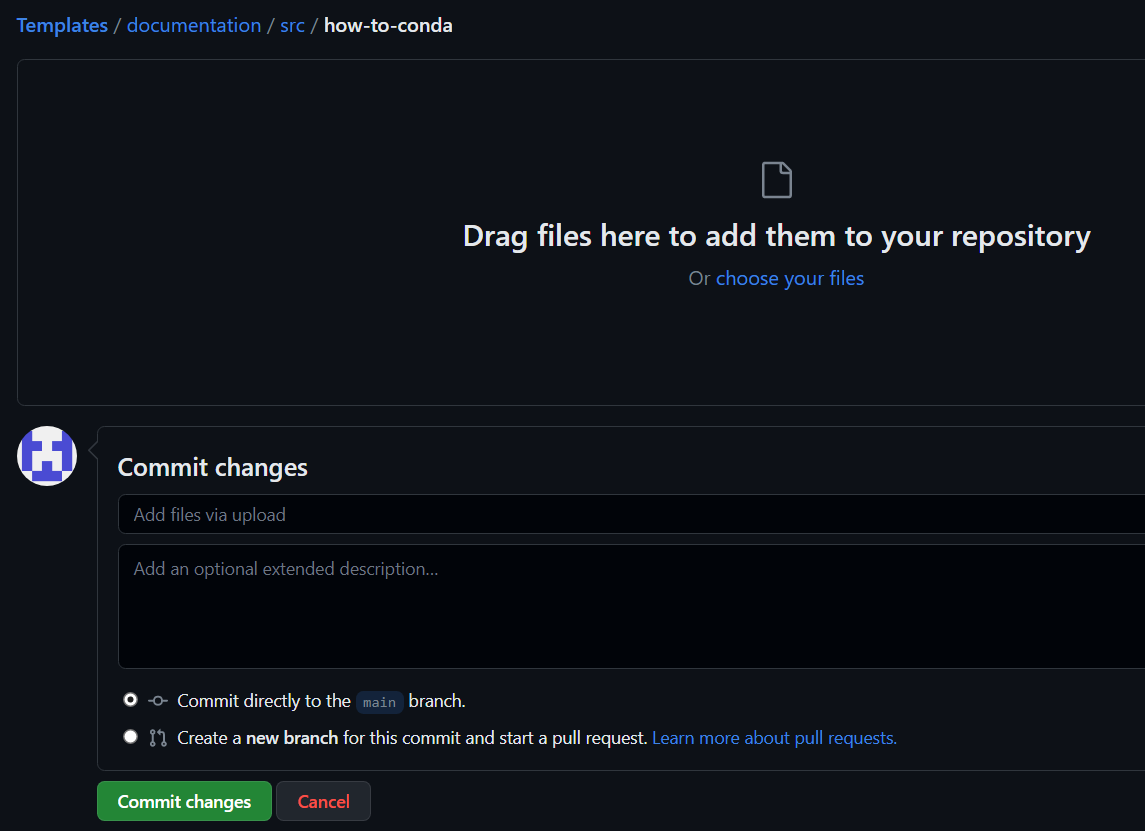
Note that the files have to be in a specific format :
- For tutorials : put them in Templates/documents/src/how-tos
- Create a new folder called
(ex: conda for “anacondas”) - NEVER use capital letters or spaces
- Create a new folder called
- inside this new folder :
- put a ‘main.md’ file for the markdown page you did
- put an ‘img’ folder for the images in .png or .jpg and the pdf contained in the markdown page
Pull request
Once the changes are done, we can move on to the Pull request :
- Go to the “Pull request” tab and “New pull request” :

- Then check the changed documents and the changes that were made :
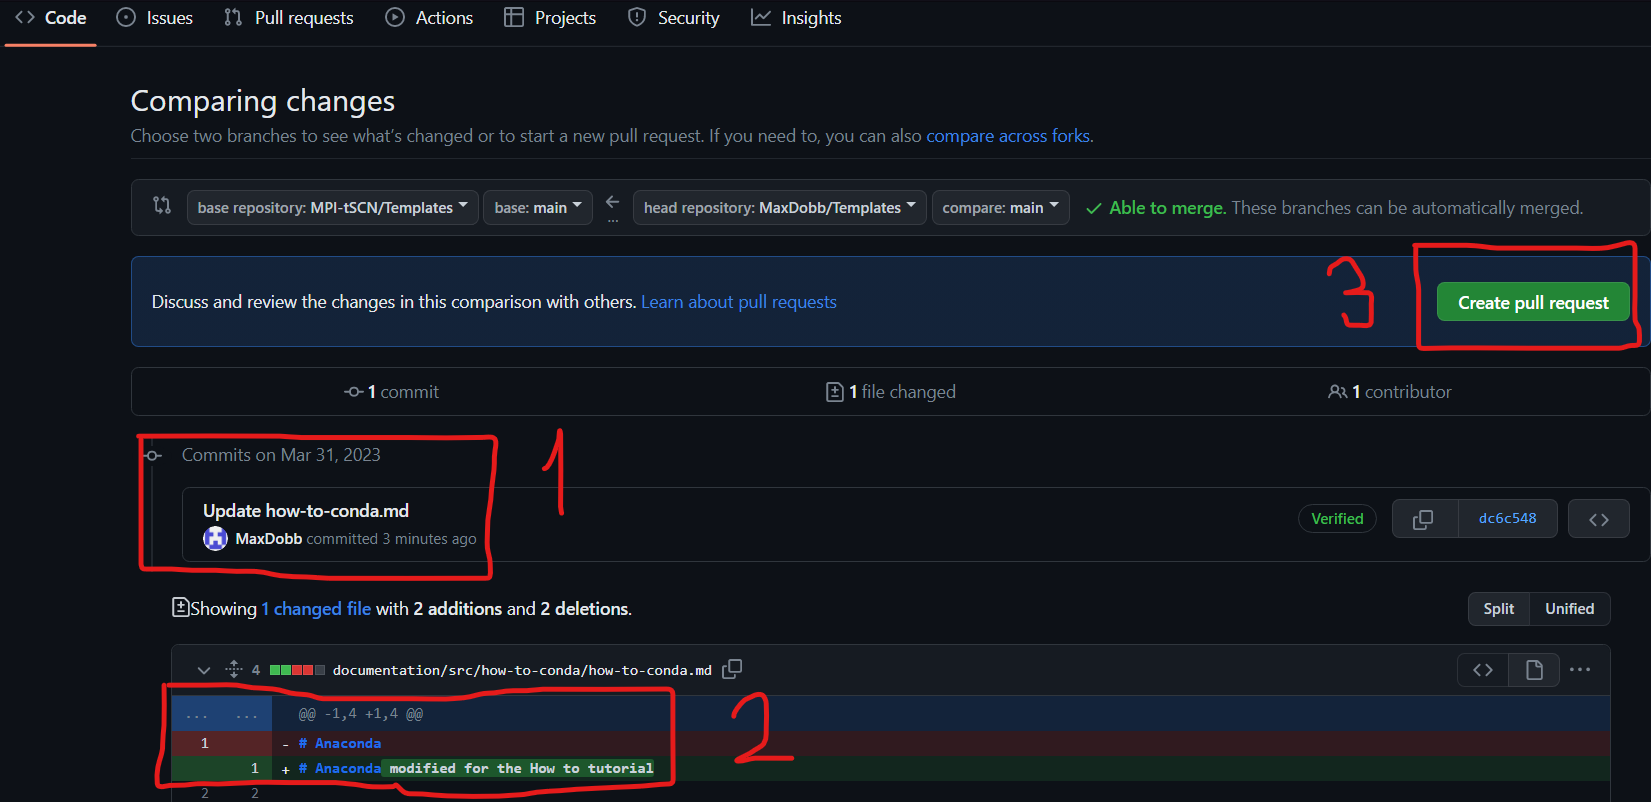
’1’ shows the modified documents, ‘2’ shows the actual changes. Once everything looks fine to you, you can tap ‘3’ “Create pull request”
- This pull request will have to be reviewed and accepted by an admin of the MPI-tSCN github group.
- Once the pull request is accepted, you will get a notification.
Please do not forget to sync your forked version of the repository after each pull request and before adding any changes.
Github vscode tutorial
As you program on VSCode you might want to back it up on github
- To do so simply open the tab on the left of VSCode and click on “publish to GitHub”
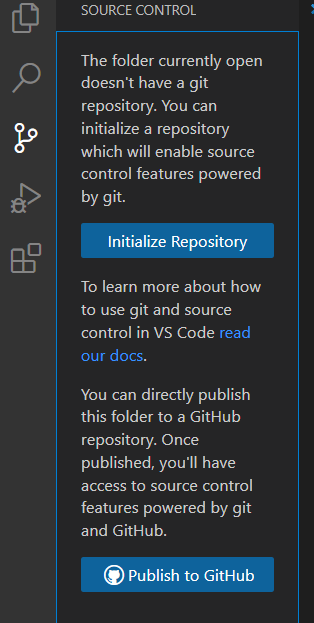
- Then you can rename the repository as you want to and chose whether it’s a public or private repository :

- Simply follow the procedure with the pop-ups from github.
Once you have selected which files you are about to push and commit to your private github repository, please head over to the .gitignore on the left-hand side and input the file formats to ignore
These specific file formats depending on the coding language can be found here : https://github.com/github/gitignore
- Once the ignored files are set, you can commit and push the files
- This process will add the files in your repository on GitHub
Once this is done, you can commit new changes and preview them whenever you want it to
- Before committing new changes, add a message in the ‘message’ area on top of “commit” on the left-hand side of the VSCode tab
- If you don’t, a pop-up will show up, simply click “yes”

- Then state your message (1) and accept (2)

- The preview will be in red for the old version and green for the new updates

This will directly commit the changes from your local files to your designated github repository
Anaconda
Availability for OS: Linux, OS X, Windows Description: Distribution Notes: can be installed locally
| Software | Anaconda |
|---|---|
| Objective | Environments for python |
| Owner | Carolina Guidolin |
| Reviewer | Marcelo Stegmann |
| Approver | Hannah S. Heinrichs |
| Contributors | Max Dobberkau |
| Version | 1.0.0 |
| Last edit | Max Dobberkau |
| Date | 28.03.2023 |
Installation
- Follow instructions at Anaconda.com
- Once you started the anaconda.exe, tick the “Add anaconda to my PATH environment variable”.
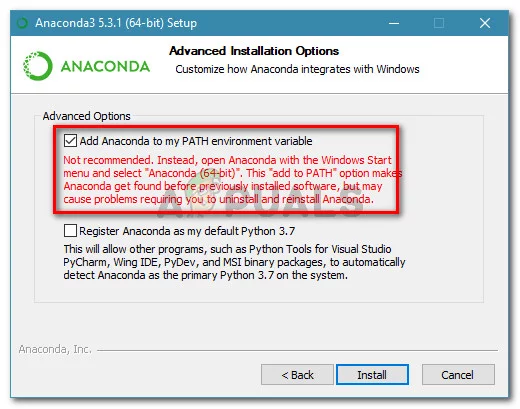
Conda Set-up in VSCode
- Create a file under your working folder in VS Code (to do this, see: Visual Studio Code How-to)
- Open a new Terminal and select cmd on the RHS (not *******powershell!*******)
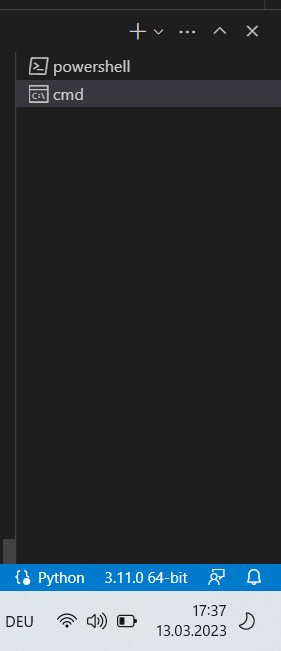 Important note : if you are on mac, you should use zsh since cmd is windows specific
 - In the terminal, type:
conda activate
- This will create a base conda environment. However, we want to create another environment where we can play around with Python code that is not the base one (here called *blub*). To do this, type:
conda create --name blub python=3.11
- To check that you have actually created a new environment:
conda env list
- To activate the newly created environment
conda activate blub
- Before starting your project, you also want to select your interpreter at the bottom right of your terminal - we want to change from Python (version installed on your laptop) to the one you have in your conda environment

- By clicking on 3.11.2 64-bit etc, this window will pop up:
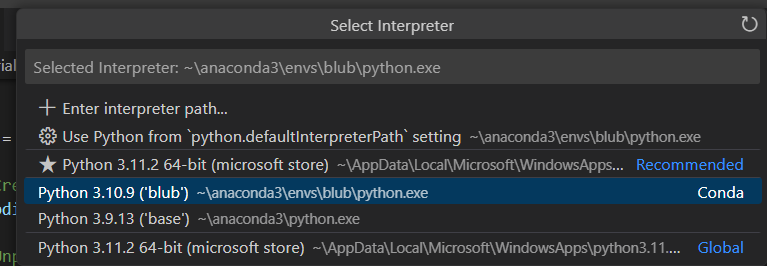
- We want to select the conda env that you are using
 If you did it right, you should now see the name of your conda environment
 - Never work in the base environment! Always do things in the generated environment
- Recommended: create an environment for every “big project” you work on.
Useful Packages
N.B.: It is recommended, when possible, to use conda (see table below) to install new packages. When conda does not have the package of interest, google other ways of doing this (make sure you trust what you find though)
General packages
| Package | Purpose | Command (check on website !!!) | Notes |
|---|---|---|---|
| Numpy | Numeric calculations, linear algebra, etc. | conda install -c conda-forge numpy | |
| Pandas | For dataframes | conda install -c conda-forge pandas | |
| Jupyter | Jupyter notebooks | conda install -c conda-forge jupyter | |
| https://anaconda.org/conda-forge/mamba | Package manager that is more efficient than basic conda | conda install -c conda-forge mamba | Once you have installed mamba, you can replace all your conda commands with mamba, e.g. mamba install -c conda-forge pandas; mamba better in sorting out compatibility issues between packages and way faster than conda. Perspective: you can |
Lab-specific packages
(install only in conda environment of the appropriate project !!)
-
PyActigraphy
-
Link to installation here
-
Package manager: pip
-
Procedure
-
PyActigraphy installition has to go through pip
-
Problem is: installing pyActigraphy through pip will automatically install many packages which are better to be installed by conda
-
Please install the following packages through conda before you install PyActigraphy
- texttable, pytz, lml, tenacity, pyparsing, pyexcel-io, pillow, numpy, lxml, llvmlite, kiwisolver, joblib, future, fonttools, et-xmlfile, cycler, chardet, asteval, uncertainties, scipy, pyexcel-ezodf, pyexcel, plotly, patsy, pandas, openpyxl, numba, contourpy, stochastic, statsmodels, pyexcel-xlsx, pyexcel-ods3, matplotlib, lmfit, spm1d
- You can to this in one go:
conda install -c conda-forge package1 package2 package3separated by a single space
-
Finally, we can download PyActigraphy:
pip3 install pyActigraphy -
-
How to RedCap - Basis & FAQ
This How To describes the standard workflow when working with RedCap in the lab and, lab standards in setting up and translating RedCap surveys.
Before starting
-
Make sure you have access to MPI/TUM Project Template
-
Make sure you have access to the RedCap channel
- to discuss questions
- to ask if someone has implemented a survey beforehand
- to ask for reviews / translations
- to share newly set up variables
New survey
- Variable names
- Conventions for coding of variables can be found here: https://docs.google.com/spreadsheets/d/1HO_OZBSEFg38lUpPxdW0KE-TZeaDmJH14Zpz2bJ_V5Q/edit#gid=576324485
- Variables should contain the name of the survey at the beginning(e.g. time variable in MCTQ could be mctq_time)
- Don’t use capital letters, only lower letters
- Use underscore(”_”) to seperate words
- Gender-neutral language
- For unspecified gender, use “they” instead of e.g. “she / he”
Translations
Import languages
- For a whole project
- Go to the project from which you want to export the translations
- Go to “Multi-Language-Management” on the sidebar on the left
- Go to “Languages”
- Below the “Add a new language” button you can see the languages that are already added to the project. Find the language you want to export and press the blue export button
- You should get options to choose which translations you want to import and which format you want to use. After choosing your preferred options press the green “Download” button(Note: after finishing this step you should have downloaded a file that contains the information about the translations)
- Go to the project you want to import the language into
- Go to “Multi-Language-Management” on the sidebar on the left
- Go to “Languages”
- Press the green “Add a new language” button(If you have already added the language you can press the edit button, which is a black pencil, close to the given language)
- Press the “Import from file or system” button
- Choose the file you have imoported from the other project and press the blue “Import” button
- For a specific survey within one project
- start by going to multi language management
- select a “study” and modify its translations (don’t forget to save)

- download the file in a json format at the very right of the line

- Go to your redcap study page
- go to multi language management
- select a language you want to modify and go on “edit language”

- Import the previously json file saved
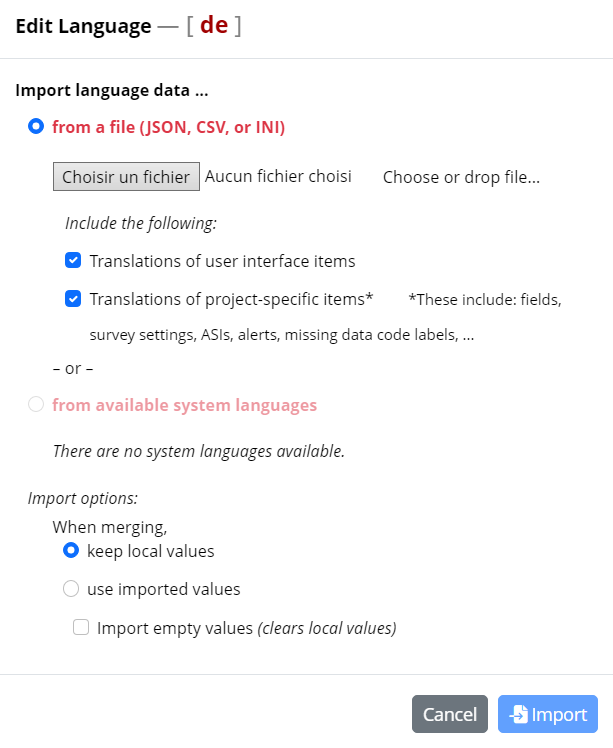
- Apply the changes, the translations will be added to your language module.
German translations
- Use ChatGPT and Deepl for translations
- Do not translate things yourself
- Correct the AI-generated languages so they match the purpose of the question
- Let another Lab member check the translations (you can tag someone in the slack channel “redcap”)
- Gender-neutral language
- Use “Gender Doppelpunkt” for gender-neutral languate, e.g. “der:die Versuchsleiter:in”
Save and export surveys as PDF
- At "Multi-Language Management", set the Default Language to the one you want to export.
- Go to "Designer", and in the Overview under "View PDF" click on the PDF button to export the survey in this specific language
- Make sure to reset the Default Language to English under "Multi-Language Management"
Literature search
General
Searching, finding, reading, evaluating, and summarizing research articles are vital skills for academics, researchers, and anyone seeking reliable information. These processes form the backbone of evidence-based knowledge and contribute significantly to the advancement of various fields. It may not be obvious how to do this, and this entry will help with this. It is a living document.
Resources
Search engines
There are a few search engines that can be used to find articles. They differ in their scope, how they present the results and what sort of filters can be applied. The two main ones recommended for use are:
Preprints
Preprints are early versions of research papers that are shared publicly before undergoing formal peer review. They allow researchers to disseminate their findings rapidly, promoting collaboration and feedback within the scientific community. While preprints provide valuable opportunities for knowledge exchange, readers should interpret them with caution since they have not undergone rigorous peer review.
Most literature that will be interesting to use can be found on:
Semantic search engines
More recently, platforms have been developed to allow for the search of publications that are related to other publications. Examples of these include:
Note: These platforms may be experimental and also may reinforce specific biases.